Tuesday, November 30, 2010

Christmas for Denami [DeNami Sketch challenge #5]

Where did the time go?  I guess most of us have been thinking of the same question nowadays.  Would you believe that it's the last day of November already?  Soon, we will be very busy for Christmas.  Have you prepared all your christmas cards?  Here's one Christmas card that I would like to share, as an entry to the DeNami sketch Challenge #05 by Ayana.  I love the detail of the design at the bottom so I thought I'd give it a try.

I used the very cute and adorable Christmas Tweetings stamp from DeNami - I stamped the image using Versafine ink in black onyx and colored them with Tombo ABT markers.  I embossed their hats and sock using versamark and white embossing powder to add dimension.   I added blue sparklets using sakura glue pen.  I added color on the background to highlight the "tweets."


I matted the image on a Christmas PP; added scalloped edges with the vine background stamp, a yellow paper quilled flower and accents at the bottom.  I placed the matted PP on a dark green card base.  Tadaaaaa!
Thanks for looking and have a Merry Christmas!

Saturday, November 27, 2010

Handmade gifts and tags [Hero Arts Nov. 2010]

Today is Friday and it's the last day of submission for HA's November challenge.  It should've ended yesterday but they moved it due to the thanksgiving parteees.  Another day to zap my little creativity.  I have been busy doing crocheted gifts for lovedones.  I have finished 2 hats this weekend.  One is for a cute baby girl and the other is for my very loving aunt. 

This pink/brown hat is for my goddaughter who recently turned 9 months.  I love looking at her photos with her big ribbon and nice hats and outfits.  So, i made her a hat and a card.  The size of the card is 4.25" x 5.5".
I used stamps from CL155 Playful animals, colored, mod podged and cut them.  I added red hats... because it is Christmas!  Then, distressed the background pp and stamped snowflakes and sentiment (from CL464 Sending holiday cheer).  I matted it on a holly paper background, added embroidery floss, a red ribbon and finally placed it on a red base.  Isn't that cute?  I just hope the hat will fit her.

The second hat is for my aunt who loves the color purple.  It was a challenging hat to make - something out of the ordinary from what i have done in the past.  I am so excited to mail it to her so i had to make this tag, asap (lol)!

For the ornament, I did block stamping on a white paper and stamp embossed the ornament - I used F5276 Flourish ornament rubber stamp.  I cut it out and placed a yellow ribbon and a green bead.   I used a background paper which i distressed with walnut stain distress ink after which,  I stamped the vine stamp.   The ornament was attached using dimensional adhesive and added a twine on top.  The sentiment was from the ending holiday cheer clear stamp set.  Finally, I punched the bottom edge with MS bubble punch.

Christmas is coming very soon and I still have a lot of crafting, crocheting and everything in between to do.  Have fun!


Saturday, November 20, 2010

Thanksgiving 2010 [Handmade Cards]

We don't have an official "Thanskgiving Day" in Manila so this would be my first one in the US.  I have always wondered why Americans, in particular, look forward to celebrating it.  What is it all about? 

I found a very interesting Thanksgiving website that you might want to check out.  Here are some portions of their article.

'"Thanksgiving is America's preeminent day. It is celebrated every year on the fourth Thursday in the month of November. It has a very interesting history. Its origin can be traced back to the 16th century when the first thanksgiving dinner is said to have taken place.

Journey of the Pilgrims
The legendary pilgrims, crossed the Atlantic in the year 1620 in Mayflower-A 17th Century sailing vessel. About 102 people traveled for nearly two months with extreme difficulty. This was so because they were kept in the cargo space of the sailing vessel. No one was allowed to go on the deck due to terrible storms. The pilgrims comforted themselves by singing Psalms- a sacred song.

Arrival in Plymouth
The pilgrims reached Plymouth rock on December 11th 1620, after a sea journey of 66 days. Though the original destination was somewhere in the northern part of Virginia, they could not reach the place owing to winds blowing them off course. Nearly46 pilgrims died due to extreme cold in winter. However, in the spring of 1621, Squanto, a native Indian taught the pilgrims to survive by growing food.

Day of Fasting and Prayer
In the summer of 1621, owing to severe drought, pilgrims called for a day of fasting and prayer to please God and ask for a bountiful harvest in the coming season. God answered their prayers and it rained at the end of the day. It saved the corn crops.

First Thanksgiving Feast
It is said that Pilgrims learnt to grow corn, beans and pumpkins from the Indians, which helped all of them survive . In the autumn of 1621, they held a grand celebration where 90 people were invited including Indians. The grand feast was organized to thank god for his favors. This communal dinner is popularly known as “The first thanksgiving feast”. There is however, no evidence to prove if the dinner actually took place.

While some historians believe pilgrims were quite religious so, their thanksgiving would've included a day of fasting and praying, others say that the Thanksgiving dinner did take place.

Turkey and First Thanksgiving Feast
There is no evidence to prove if the customary turkey was a part of the initial feast. According to the first hand account written by the leader of the colony, the food included, ducks, geese, venison, fish, berries etc.

Pumpkin and Thanksgiving Feast
Pumpkin pie, a modern staple adorning every dinner table, is unlikely to have been a part of the first thanksgiving feast. Pilgrims however, did have boiled pumpkin. Diminishing supply of flour led to the absence of any kind of bread.

The feast continued for three days and was eaten outside due to lack of space. It was not repeated till 1623, which again witnessed a severe drought. Governor Bradford proclaimed another day of thanksgiving in the year 1676. October of 1777 witnessed a time when all the 13 colonies joined in a communal celebration. It also marked the victory over the British.

After a number of events and changes, President Lincoln proclaimed last Thursday in November of thanksgiving in the year 1863. This was due to the continuous efforts of Sarah Josepha Hale, a magazine editor. She wrote a number of articles for the cause."


Each one of us have our own reasons to give thanks for:  family and friends good health, provision, work, blessings, etc.  Everyday is a day to thank God for all His blessings and this special holiday makes it even better.  I made and mailed my first thanksgiving day cards today.  I had fun creating these cards. 
I used HeroArts rubber stamps (F3585, F3586, F3587, F3590), HA clear pumpkin stamp, falling leaves and sentiment.  My SIL had a nice rubber stamp block with sunflowers and a table spread of fruits - i colored them with Derwent watercolor pencils and burnished it to give texture and definition. 
I love all of them and hope that it brings the reader a warm smile as well.  The inside of the card reads: 
"For the Lord is good; His lovingkindness is everlasting, and His faithfulness to all generations." - Psalm 100:5
HAPPY THANKSGIVING!   


Monday, November 15, 2010

Potted beret [Gift packaging idea]

My sister-in-law's birthday is coming so I made her a green beret.  The next thing I had to figure out was how to uniquely package it.  Hmmmm... I looked at my craft nook and saw a ceramic pot that I bought a few months ago.   So there...

Materials needed are as follows:
Cardstock
Quilling paper, slotted quilling tool
Scissors, craft tweezers, glue
A lot of creativity and love ☺ 
Steps:
1.  Prepare quilled flowers.  I made a balloon, white daisies, yellow buds and weaved brown paper to serve as a flower pot.  {Click if want to learn paper quilling}.


2. Once the flowers are ready, it's time to arrange them.  This is where the excitement begins. I used glossy accents - I love how the tapered opening makes it easier to get into small spaces.


3.  Attach the finished bouquet onto the base cardstock.  You may use double-sided adhesive.  Then, tape a stick behind the card - be sure to secure it properly (you wouldn't want your tag to fall off the stick and ruin the surprise ☺)
To avoid injuries, make sure you trim the pointed end of the stick.  This is important especially if you are making projects with the little ones.
There you have it!  This card will make your potted gifts extra special.

Since summer is over, I opted to use a colorful ceramic pot to "plant" my handmade crocheted green beret.  I formed it into a rose and wrapped it in tissue paper before placing it in the container.  Then, I added the finished gift tag.  Tadaaaaa!
The inside of the card reads:  "May God continue to bless and embrace you with the warmth of His love.  We love you.  Happy birthday."  ☺♥☺


Friday, November 12, 2010

Crochet Away! [Cloche Hat]


Hello friends!  How are you?  What have you been busy with?
I have been wanting to do another hat following The Art of Crochet's video tutorial.  I searched and found this:  Cloche hat.  It was a realtively basic hat to make, though it took me 4 hours.  I wanted to challenge myself by adding 2 rows of HDC near the brim and after some trial and error, it came out pretty nice.  I added 2 rows of HDC for the brim.
Lovely!  Thanks, Teresa!

Saturday, November 6, 2010

HA Quickcard4


Quickcard4
Originally uploaded by cabbycraft
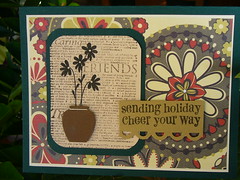
Today is a nice, cool, sunny and lazy Saturday. I browsed through flickr and what do you know? HA's Barb has a 90 minute scrambler challenge. It was my first time to join so with barely 35 minutes left, i grabbed my stuff. Her challenge was to make a Christmas card using flowers (emphasis on NO POINSETIAS ☺). So i grabbed my favorite flower stamp, friend definition background and punched pot. I love it! Then, i stamped the sentiment on gold paper and tada! My quickcard is done!
Next challenge for me was how to post it on the HA group and then to to the discussion board. All this computer and blogging hi tech terminologies are quite challenging to me so it took awhile before i could finally upload it on the discussion board. Geeez... i hope i made it on time.
That was fun. I never thought that being under time pressure could make my creative juices flow so fast. Hahaha... if it was like that everyday, i'd have tons of cards to upload.
Have a great weekend, my friend!

Friday, November 5, 2010

Christmas in November

Can you believe it?  It's November 5 already and i haven't made a card yet.  Hahaha.  Trust me, for a craft enthusiast, that's a dilemma.  It gets so overwhelming looking at the blogs and all the tutorials going on - it's like being in a class with so many homework to do. 
Anyway...  I made a Christmas card today.  I used HA Cl464 Sending holiday cheer set.  I love the set but somehow, i find the sentiments too large to fit regular card size (4 1/4 x 5 1/5") or perhaprs, i'm not too creative to figure the best way to use it. 
Since i will be spending my first white Christmas, i made a winter landscape.  I stamped and embossed pine trees for the background.  I stamped a house, colored and tried adding mod podge matte to it.  It was my first attempt to use mod podge and i like it.  I added designer paper on on the bottom.  I added shades of green to offset the "blue winter" scene.
Thanks for looking.  Blessings!

Materials:
HA CL464 Sending holiday cheer
Clearbox white ink; Judikins opaque white embossing powder
Versamark; Judikins Black embossing powder
Marvy markers
Cardstock:  cream, blue, white

Check out:  my Flickr