Monday, October 31, 2011

Tanjoubi Omedetou [Happy Birthday in Japanese]

Have you seen this clear stamp set from HeroArts?  It's so cute!

One of our famly members is celebrating her birthday so I decided to use the stamps for her card.

I stamped the Japanese girl on white cardstock and the robe on a green patterned origami paper using Versafine ink.  I added a green bling-bling on her hair.
The paper lamp was stamped in white cardstock and colored using Tombo ABT markers.  I added embroidery floss for on the top and bottom of the lamp.
The sentiment is from HeroArts too.

I layered these elements on a designer paper and then on an off-white cardstock that was distressed with Ranger's bundled sage.

Have a great week of crafting!

Enjoy!

Thursday, October 27, 2011

Gold Flower Polymer Clay Pendant [Chatoyant Mica Shift Technique]

Do you love holographic designs?  There is a polymer clay technique called Chatoyant Mica Shift that creates three dimensional or holographic effect using metallic sheets of clay. 

This technique is credited to Pier Volkus and Mike Bessler.  The effect happens when the mica flakes in the metallic clay are shifted when stamped on, hence the name.  After stamping, the raised areas are gently scraped to reveal a smooth and holographic image of the stamp.

I stamped Premo Antique Gold polymer clay with a floral themed stamp and gently scraped the raised areas.  Premo Black clay was used for the base.  The pendant was cured and Lisa Pavelka's Magic Gloss  was added to complete the piece.


A 24 inch leather cord or cable chain can be added to complete the piece.

Enjoy!

Tuesday, October 25, 2011

Twist and Turn [Makin's Clay Extruder Tutorial]

Yay!  I have a new tool for my polymer clay adventure:  a Makin's Professional Ultimate Clay Extruder.  There are many blogs and articles on different brands of clay extruders, stating the pros and cons between the brands.  I was surprised to read that for some brands you have to get a caulking gun to help extrude the clay.  When I saw and read about the Makin's clay extruder, I decided to give it a try.

The Makin's extruder is color green and has a ridged surface which aids your grip during use.  It includes 20 discs with different shapes including square, round, flat, and screen discs.  You can use it to make hair, ribbon, weaving, beads, etc.

I have always wondered how to make canes without having to mix too many clays, rolling, reducing, etc.
Here's a tutorial on how to do that using a clay extruder. 

First, condition different colors of clay (I used Premo' turquoise, alizarin crimson, black and beige clay) and cut them with a round cutter. 
Put them inside the clean  barrel of the clay extruder and use a square disc.  Extrude the clay and be amazed at the color combinations.

TADA!


You should see my face when I saw the resulting color combo.  This was an awesome technique.

Do come back to see what I've made with these pretty babies.

Happy crafting!

Enjoy!

Monday, October 24, 2011

Twirling Paper once again [Paper Quilling Floral Arrangements]

Like many crafters, I have accumulated so much stuff over the years. I spent the past several days sorting through my boxes of hidden treasures and found my paper quilling materialas and tools.  Suddenly, I was back to twirling paper once again.

I was introduced to paper quilling in the Philippines several years ago.  Basically, it's just twirling paper through a needle or a slotted tool.  There are so many things and designs that you can make out of it:  flowers, leaves, animals, party stuff, etc.


I found my kit from Lake City Craft Co.:  Pretty Fringed Blossoms #215 designed by Jane Hui Cuan Wu and decided to make 2 of the arrangements.  The woven baskets are just pretty.


I love the colors and design of this second arrangement - it's so cheery!

I am thinking of designs that I can incorporate in our thanksgiving and Christmas cards. 
Have you tried paper quilling?  Give it a try and share it with me too.

Enjoy!
Happy crafting!

Tuesday, October 18, 2011

Floral Barrettes [Polymer Clay and Metal Barrettes]

On a cold and dreary day, I decided to make an inventory of all my jewelry and craft supplies.
Among my stash were metal barrettes that were calling me to rescue them from their bare state.
And so I did.

I conditioned Premo black polymer clay, added texture and layered turquoise dots and millefiori flower canes.
The design was inspired by a designer paper that I also used as the background of the photo.
The polymer clay was baked with the metal barette and was secured after baking using superglue.
The barette measures 3 1/2 x 3/4 inches.

I'm on barrette mode.

Enjoy!
Happy Crafting!

Friday, October 14, 2011

Turque Locket [Turquoise and Red Necklace]

The combination of Turquoise and shades of Red is always a perfect choice.
This necklace combines polymer clay, metal locket, chalk turquoise and crystal beads.

The round locket pendant measures 1.25 inches in diameter.  I added Premo' turquoise polymer clay, stamped and decorated it with red shades of floral canes.  The back of the locket is covered with plain turqouoise polymer clay that was stamped with the same image as the front.
   

The chain is silver and measures 29 inches.  The design of the necklace is completed with the addition of a toggle clasp, 10 mm chalk turquoise beads and 4 and 8 mm red crystal rondelles.

The necklace hangs beautifully. 
The asymmetrical design draws the eyes to the pendant which  brings about cohesiveness in the design.

Enjoy!

Thursday, October 13, 2011

Christmas in the Air Part 2 [2011 Christmas Cards]

I stamped more for our Christmas holiday card stash!

The stamped Christmas sentiment on the center of the card reads: 
"May the wonder that is Christmas touch the child within your heart."

I added a stamped wreath border that I distressed and colored with pencils.
I used gold, green, and red for the mat.
This was then layered on an ivory cardstock.


This card uses an acrylic stamp from Hero Arts.  I layered it with a red origami paper and green mat.
Blue snowflakes were stamped on the background of the ivory cardstock.

Just a few more to go and we're all set for Christmas.
Oooops... got to do our Thanksgiving cards.

Happy crafting!

Wednesday, October 12, 2011

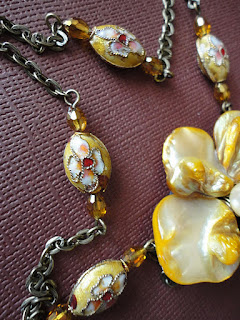
Cloissone & Mother of Pearl Necklace

You must have noticed that I love using Cloissone' beads many of my jewelry designs.  The variety of colors of the bead makes it exciting to design with. 


This is a piece that I made using yellow oval cloissone' beads, crystals and a floral mother-of-pearl accent.

It's simple.

It's Pretty.

It's 100% handmade.

Wednesday, October 5, 2011

Floral Pendant [Component Caning Technique]

Have you heard of the Component Caning Technique by Donna Kato?
I learned about it through HGTV and was excited to try it out.

As a newbie in polymer clay, I am anxious about polymer clay caning and millefiori techniques
I think I have to replace the word anxious to a tad LAZY.

I made a skinner blend using Premo' white and blush clay. 
Then I made a bullseye cane, cut it in half and made tear drop shapes.
These segments were laid side by side to form "one petal."

To assmeble the pendant, instead of using gold clay as the base as in Donna Kato's HGTV tutorial, I conditioned and rolled Premo' black clay in the thickest setting and positioned the thinly cut segements of the petal to form the flower. 


Donna Kato discussed component caning technique extensively in her HGTV tutorial.

To complete the necklace, I added a gold chain with cloissone beads, black crystal and tiger eye beads to complement this black-white-pink pendant.

TADA!

I like the simplicity and beauty of this technique.

Monday, October 3, 2011

Colors of Fall [Polymer Clay Bangle]

I love the colors of fall:  shades of orange, yellow, green and brown.

This bangle is made of mixed colors from Premo sculpey polymer clay.
The piece exudes a warm feeling... to offset the cold and rainy weather of fall.


The polymer clay piece was baked on and secured on a floral metal base.
I love the rustic look.

Saturday, October 1, 2011

Green Day [Molding with Leaves]

Making molds..  that's what I wanted to do next.

So I bought a Sculpey mold maker but I found it too sticky to use for molding leaves and other delicate materials.  It didn't copy the details as I expected.  
After doing some research, I learned from several authors that Sculpey Bake and Bend  can be used. 
Off to the store I went.

On the day of my experiment, I gathered a couple of leaves:  a fern and a small hibiscus leaf.
I got a piece of clay, conditioned, placed it on a parchment paper and then rolled it 5-UNO cards thick - ohhhh, I love these tiny UNO party giveaway cards that only measure 1 x 1.5 inches.  So cute!  It makes my clay look huge!


I dusted the clay with a little powder and layed the leaf with the wrong side against the clay to have a nice imprint of the veins.  This was then rolled one-way (from top to bottom) twice.

I love the way the clay copied the design.  Can you see the detail? It was just the way I wanted it.
These were baked on the same parchment paper according to manufacturers instructions.
They came out nice and flexible.

My mind is zoning with the ideas and projects for these molds.
Until next time... Happy claying!