Pages

Sunday, June 30, 2013

[Diaper Cakes] Fast and the Furry Friends Motorcycle Diaper Cake

I would like to introduce you to these three adorable furry friends who are out to go on a bike.

There was a baby shower for 3 mothers in church today and I made these as gifts.  They are  a new twist to the diaper cake.

motorcycle diaper cake
This is "not-so-curious Jorge."  LOL. There are many tutorials on how to make these diaper motorcycles  such as this.  You just need diapers, receiving blankets, socks or mittens, washcloths, a bottle or sippy cup, rubberbands, ribbon or paper and a stuffed toy.  The instructions are simple, it's the shopping that could be a little challenging but fun.
Motorcycle diaper cake

The emblem says: 
"Hello Baby!"
"Every good and perfect gift is from above, coming down from the Father of the heavenly lights, who does not change like shifting shadows. - James 1:17"

These mothers are blessed to have children.  I don't have children of my own but I know that I have the responsibility to make a positive influence on them.  
motorcycle diaper cake
Off we go!  Weeeeeee!!!!!

Have a wonderful week!
♥  michelle  ♥

Monday, June 24, 2013

[Beads] Bead Hoarders Blog Hop

Hello friends!  I have a confession to make:  I am a bead hoarder  and I'm so happy that I'm not the only one.  LOL.

Ms. Lori Anderson of Pretty Things Blog, host of the Bead Soup Blog Party series and author of the book "Bead Soup" is hosting the "Bead Hoarders Blog Hop" on July 20, 2013.
All of us have a box or even a trunk of beads, charms or findings that we are holding on to because one, we don't know what to do with them or two, they are too special to make into a piece to wear for our own or to sell. Well, I have my own stash of beads that will see the light once again.

See you on July 20!
Have a wonderful and blessed week.

♥  michelle  ♥

Wednesday, June 19, 2013

[Tutorial / Tips] Using Embossing Folders as Texture Plates for Polymer Clay

I have accumulated quite a number of tools in my craft room and I organized them depending on whether it's for papercrafting, cardmaking, jewelry making, or for polymer clay projects.  

The photo below shows some of my embossing folders from Sizzix and cuttlebug (I have smaller dies too from Vintaj) that I use in making my cards.  It occurred to me that I can use it for texture for bigger projects (duh)!
Embossing Folders:  Sizzix and Cuttlebug
Many polymer clay artists use stamps, get a negative image of it, cure accordingly and use it for their polymer clay project.  Well, I want to cut a few steps, save a little time and money.  I used Prmeo clay - it holds the texture pretty well.
Acrylic stamp from Inkadinkado

Embossing folders have 2 sides:  positive - with the raised design and negative - raised background.  I cut 2 circles - 1 thick and 1 medium thickness polymer clay and pressed it against the negative side of the folder (I sprinkled a little constarch as release).  The clay was then cured according to the manufacturers' instructions.

The photo below shows how well defined the stamped embossed images are.  These can now be used as texture plates for pendants, mokume gane technique, etc.

You can also use different materials to make all kinds of texture sheets... explore and have fun!

Have a wonderful day!
♥  michelle  

Monday, June 17, 2013

[Post Tutorial] Bettina Welker's Pixelated Retro Blend Cane

Happy Monday!  How was your weekend.  Mine was great - I was able to organize my craft room a little, with only a couple of storage bins to go through.  I still have to decide whether to do an inventory of all my supplies but it's too tedious to count or weigh my beads plus I wanna hang out, watch a movie and play video games with my hubby.  
As long as it's below my budget, we are fine with that (wink! wink!)

Have you heard of Ms. Bettina Welker's "Pixelated Retro Blend?"  Here's a photo from her website with a FREE tutorial.  Thank you for sharing your "aha moment" technique with us, Bettina.  Much appreciated!


photo credit from HERE

We had our local guild meeting last Saturday where we talked about this technique and when I got home, I took out my clays and Makin's extruder and tried it out.  The first thing I did was to figure out which colors to use.  I thought of using Premo Purple and Turquoise and make "in-between" color blends.  Bettina suggested having 5 different shades plus black and white.  In making different shades, I used a cookie cutter to measure equal amounts of clay, cut 4 circles and replacing some circles with the other color, then mixed them up.  The shades where too subtle or "close" to each other which is why I will use colors that would have a better contrast next time.   

The other problem I had was that my cookie cutter was a tad bigger than the Makins barrel.  I tried to use the end of the barrel to cut the circles out and it worked. however, be careful not to distort it upon taking it out.  Following Bettina's tutorial, I arranged the circles as follows:  white, 2 colored circles, black, 2 colored circles then repeat until the desired length to fit the barrel.  I placed the purple side first, as per the instructions.

To extrude the clay, I used 2.5 mm circle disc and extruded a good length of clay.  This was the pattern that was formed (kindly refer to photo below).  Then, I decided to slice thin veneers to cover my small altoid tin.  I applied a thin layer of black clay then the veneer.  This was baked in the oven for about 20 mins, sanded and buffed to a medium sheen. 
Pixelated Retro Blend Cane
Bettina Welker
So what do you think?
I still have to finish the bottom part of the tin but I think I will keep it plain.  There are rooms for improvement for me - my canes have been slightly distorted when slicing - I blame the heat over here because it softens the clay too much.

Thanks for stopping by the blog and have a wonderful week!

See you soon!
♥  michelle  ♥   

Saturday, June 15, 2013

[Focus on Life] Week 24: Green

Welcome back!  It's Week 24 over at Ms. Sally Russick's Focus on Life and this weeks' prompt is GREEN.  Sally described the prompt as follows:  

GREEN:  the color of balance, growth and harmony.
GREEN:  evokes the feeling of calm and symbolizes self-respect and well-being.

I totally agree with her!  To me, it means life - natural and organic.
This is the photo that I want to share with you.  Can you guess what these are?

Doesn't it resemble a bamboo tree?  
Well, these are tissue rolls that I have been saving for whatever.  My husband would laugh at me when I ask him not to discard odd stuff for me especially when I tell him that I will be using them one day - I think he hasn't realized that I am just recycling and trying to save the environment.  Hahaha!

Well, the day has come for these rolls.  I mixed green and black acrylic then painted them to look like the bamboo trunk.  For added interest, I added a white paper quilled white flower matted on a textured yellow cardstock.  I like how it stands out, looks very fresh.

Now, let's head over to Sally's blog and check out the other "green stuff."

Have a wonderful weekend!
♥  michelle  ♥

Friday, June 14, 2013

[Card] Thinking of You

Happy Friday!

I just wanted to let you know how much I care.


Have a blessed and safe weekend, my friend!

♥  michelle  

Thursday, June 13, 2013

[Food] Zongzi & Dragon Boat Festival

My co-worker from China gave us some Zongzi.  Zong... What? 

"Zongzi is a traditional Chinese food, made of glutinous rice stuffed with different fillings and wrapped in bamboo, reed, or other large flat leaves. They are cooked by steaming or boiling."

These sticky rice treats are traditionally prepared and eaten during the Dragon Boat Festival where they commemorate the death of Qu Yuan, a famous Chinese poet.  The one she gave us were wrapped in bamboo leaves and tied with kitchen twine.  One had meat and the other with sweet dates.  We don't have a microwave at home so I steamed it for about 15 minutes.
Meat Zongzi
Sweetened Dates Zongzi
We have a similar type of food in the Philippines, the "suman" which is sweetened glutinous rice wrapped in banana or coconut leaves (called "ibos"  in the Hiligaynon dialect).  I preferably eat it with ripe mango... oh my.. yummy!  Zongzi is also called as "Chinese tamales" - probably because of the similarity of the cooking process.

We enjoyed eating it, dipped the meat in soy sauce and the one with dates in sugar.  Mouthwatering.

Isn't it nice to try food from other cultures?  Try it sometime.  Explore.  Make friends with someone with another culture.  Enjoy!

Blessings,
♥  michelle  ♥

Wednesday, June 12, 2013

[Celebration] 115th Philippine Independence Day

Today, June 12, we celebrate Philippine Independence Day.  It was on June 12, 1898 when we declared our independence from the Spanish rule by General Emilio Aguinaldo and Filipino revolutionary forces.  The flag of the Philippines and the national anthem were raised and sung for the first time that day.  Shortly after that, Spain surrendered the Philippines to the United States.  Eventually, the Philippines revolted against the United States in 1899 and achived national sovereignty on July 4, 1946.  Independence day was observed on July 4 until it was finally moved to June 12, hence, the National Holiday.  

There are several books that tell of our history.  You may also read about it here:  www.history.com.
Taken at The Ninoy Aquino Parks and Wildlife in Quezon City, Philippines on January 2009
My grandparents had a lot of stories about the war - it was a very difficult time.  My dad was a baby (born in 1941) and they had to hide in the fields from the soldiers.  They brought a live goat with them as his source of milk.  My mom (born in 1942) and her siblings also had a rough time.  I love listening to live accounts of the war - hearing them always brings me to tears.

Kami ay mananatiling Pilipino sa isip, sa salita, sa gawa.
We will always be Filipinos in our mind, words and actions.

Mabuhay ang Pilipinas!

Tuesday, June 11, 2013

[Crafts] Traditional Filipino-themed banquet: "Bahay Kubo"

Our church is hosting Filipino Pastor's from all over the US today and I wanted to share the work of the team - Team "Bahay Kubo."  The Bahay kubo or Nipa hut is a native house in the Philippines in which the walls are made from bamboo tied together walls and the roof is of the nipa/anahaw leaves.  The photo below is a small nipa hut in my Mom's ancestral home in the province.  It's a nice place to cool off while sipping the juice of a freshly harvested coconut or savoring the juice of a ripe yellow mango.  Ohhh, delicious!


There is a song on the "Bahay Kubo."  You can do a youtube search to hear how it sounds - it's one of the songs that in my opinion every Filipino toddler (whether pure or inter-racial) should be able to sing.  The song describes the bahay kubo as despite being small, is full of different local fruits and vegetables which are then enumerated.  

We decorated the buffet table with various fruits and vegetables in season and placed them in different kinds of baskets.  The baskets and the woven fabric came from the private collection of the ladies and they were very nice.  I'm not even sure if they still make this good quality products.  The banana leaves are fresh from the garden.  We love how it turned out.  


We also prepared welcome kits that included a directory of local Filipino restaurants and a couple of pastries among others.

I had several empty starbucks coffee bottles which we made into table centerpieces.  We added decorated sticks and greens then placed it on top of a square green burlap.  I will take a better photo and re-post it.

To make it more festive, we added large buntings that ran across the width of the gym.  I used construction paper, jewelry hemp cord and glue... ohhh.. it was tedious but I love how it turned out.    

We spent about 3 hours from start to finish, that's pretty fast considering we had to steam iron the table cloths, etc.  It helped that some of the items where prepared beforehand.  It was a group effort - blending of minds, skills and talents.  

It's amazing how we can glorify God in simple ways such as this.  It's always fun serving with people who love God as well.

This afternoon, I will be cooking beefsteak for them... and that's another story.

Have a blessed day!
♥  michelle  ♥

Monday, June 10, 2013

[Crafts] Bottlecapped Words: Honor your father and mother

Hello friends!  Hope your doing great today.
It was a busy weekend for my husband and I as we juggled personal and church responsibilities but God has sustained us through it all.  I gave the message during the Junior worship and it was based on our memory verse found in: 
Exodus 20:12
"Honor your father and mother, 
so that you may live long in the land the Lord your God is giving you."

This is the 5th commandment and it's the first one that gives us a promise - that we will live long....  It sounds pretty simple but as I was preparing my message, I realized that I have done things to disobey God and my parents.  I believe that God in all his splendor and grace has forgiven me.  As for my parents, things cleared up after the storm so to speak - they have shown their unconditional love for me I love and long to be with them again soon.

Several stories from the Bible describe the fathers love to his child:  The Parable of the Prodigal Son, Joseph taking care of his father and family, and the story of Abraham and Isaac.  In all of that, the LOVE of the father to his son prevailed.

Going back to our Junior worship - I made magnets that had our memory verse so they could display it in their refrigerator.  
Oh, it was so nice to hear their ideas on how to honor their parents... it's amazing how we can be blessed by the lives of the little and not-so-little ones.

Memory Verse
Bottlecapped Words
I printed the verse and used Mod Podge to stick it on the chrome bottlecaps.  I added charms for the girls and kept some plain for the boys.  The back of the bottlecap had the date June 8, 2013 and a neodynium magnet.  I wanted to put the date so they can remember when we had this particular lesson.

It is never too late to tell our parents that we care and honor them.  For those of you who are parents and grandparents, I admire you for loving your children and grandchildren.  May you be blessed!

See you soon!
♥  Michelle  

Sunday, June 9, 2013

[Gifts] Charming Charlie Graduation Gifts, Handmade packaging and Dayspring Cards

It's Graduation time here in the States and we got several friends whose children are graduating from kindergarten, high school and college.  Wow, such a fun and exciting time for the graduates and their families.  Today, we are attending the graduation parties of 2 ladies (one of them is also celebrating her debut).

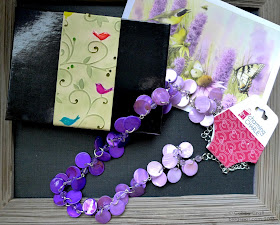
I wanted to make them something but it's been a hectic weekend so I bought them these pretty necklaces from Charming Charlie.  I love going to their store because it so full of eye candy, beautifully arranged by color scheme.  Their designs are nice but definitely not one-of-a-kind.  

Charming Charlie Blue

Charming Charlie Purple

I packaged the necklaces in a black box and added an embossed card that I colored using Tombow ABT markers and Tim Holtz's distress inks.  I added dimensional magic over the birds and tied a light blue ribbon around the box.  Simple but pretty.  The blank cards are from Daysrping Blank Notecards - I prefer blank notecards because I like writing personalized messages.

I remember by HS graduation which we are celebrating 25 years of in December.  Yay!  It's Silver Jubilee and it's a big celebration.  I wish I can go home to Manila and be there.  

Oh my gosh!  I couldn't imagine bow fast time flies.  When I was younger, I would watch my mom and her classmates laugh their hearts out while reminiscing their days in HS and Nursing school and now... it's my turn.  Good thing, I don't have kids who'd laugh at how funny we are.

There are times when I wish I was still young - with money regularly being given to me and who's responsibility was just to study.  I have to give all credit to my Dad and Mom for working hard to send me and my 2 siblings to school.  I was in Med school so they had to spend more money on me - time, love, effort and money that I can never repay them back.  Thanks, Daddy and Mommy!

Do you have children who are graduating soon or are you an empty-nester already?

Have a great and blessed week, my friend!
♥  Michelle  ♥

Saturday, June 8, 2013

[Focus on Life] Week 23: Typography

It's Week 23 at Ms. Sally Russick's Focus on Life over at The Studio Sublime and the prompt was:  Typography - the power of the written or typed word can be more powerful than you thought!
The style and appearance of printed matter has an effect to how we view items, websites, businesses, book titles and the list goes on and on.   Is the typography pleasing to the eye, does the font pull you in, draw you away, make you feel inspired?  This week focus on the printed word and see what the words are saying to you!

I wanted to share something that's been my bestfriend for the past months.  I love receiving stuff from the mail!  The excitement is overwhelming at times especially if it's something that I have eagerly waited on and more so if it's a surprise package.  Woot woot!
USPS
Most people these days prefer to write emails or send text message through their smartphones.  That's good but sending someone snail mail is even better.  There is something about opening a letter or a card from someone you know.  I know you hate getting junk mail, utility and credit card bills - you are not alone - just shred and throw them away.

Send someone a letter and make that someone happy.
Visit the other photos HERE.

Be blessed!
♥  Michelle  ♥

Thursday, June 6, 2013

[Food] Slicing Watermelons

It's almost summer and I've been seeing a lot of watermelons in the grocery stores... yum!  Do you love eating watermelon?  If so, do you get bloated, constipated and feel gaseous?  Watermelons have a high water content hence they ferment faster than the other foods that we eat.  In order to avoid unwanted effects, try eating watermelon or other fruits with high water content alone next time and see the difference.  Let me know if this information helped you.

Another way to enjoy watermelons is to prepare them as clean as possible.  Be sure to wash your hands and kitchen utensils appropriately.  I like serving them in small pieces as it is easier to handle, avoiding drips on your white shirt... ekk!
My mom taught me how she does it - clean and simple - and I'd like to share it with you.
Serving Watermelon
Prepare a clean bowl.  Cut one whole watermelon into quarters then into 1 - 11/2 inch strips.  
I like holding the watermelon as seen in the photos but you can place them on a clean cutting board. Remember, SAFETY FIRST!  

Carefully run the knife vertically and cut into 1 1/2 inch strips from one end to the other.  Then, run the knife horizontally, allowing the pieces to fall on the prepared bowl.  When you get close to the bottom, whitish part, carefully slide the knife along the curve of the base, away from your hands and fingers.

In doing so, you avoid touching the fruit hence decreasing the risk of contamination.
This is best served chilled.
Enjoy!!!
How do you serve watermelons?  

Have a blessed day,
♥  michelle  


Monday, June 3, 2013

[Post Tutorial] Rocky Path Pendant

One of the things that I am grateful for in this era of hi-technology is the ability to research for different stuff without getting off my computer chair for a long time.  As artists, I bet you have experienced looking at a website that leads you to another and another and another.... then you realize that it's dinner time or worse, you hear the rooster crow (tik-ti-la-ok in the Filipino language).

I have purchased a couple of tutorials recently and one of them is the Rocky Path tutorial by Ms. Christi Uliczny.  It was first time to purchase a tutorial from ETSY and was very pleased with it.  The photos and instructions downloaded as soon as my payment was cleared.  They were very clear and descriptive, the photos very helpful as well.

This is the first piece that I made using a different texture plate and set of inks.  I used Premo clay and I love it!

The finished piece looks pretty and feels smooth in reality.  I didn't use any surface treatment or gloss - the high sheen was brought about by sanding through several grits of sandpaper and buffed to achieve the glossy, glass-like finish.  Gorgeous!

I will be making pendants and bead components using this technique.  
More updates on this soon.

Have a wonderful week!
See ya!
♥  Michelle  ♥