Pages

Wednesday, August 28, 2013

[Wilton Wednesday] Basic 1 Course Graduation

Yesterday was the last day of our Wilton Basic Decorating Course and I had a blast!  I've been reading and browsing through books and magazines for tips and tricks on how to improve my skills but nothing beats taking an actual class, interacting with a teacher and fellow students.

This was my final decorated cake project.
I decided to use a 9" x 4" round mock cake.


I bought the Wilton concentrated icing gel color and used red, green and blue.  I didn't use much hence the pastel hues which turned out pretty to me but may be too dainty for others.  
It's a cake for a baby shower or a shabby chic tea party.

I sent a photo of the cake to a friend who was celebrating her 16th birthday (mind you, pink is not her favorite color) and she politely replied "The cake looks nice...."  My husband and I giggled about it.

So what did I learn?
I learned... 
how to make buttercream {mine lasted 4 weeks of class}
how to properly crumb coat and ice a cake
how to dispose of leftover buttercream 
(throw it in the garbage, not in the sink)
how to make different borders and flowers
how to use different techniques in writing messages
how to have more friends by taking a class or having a new hobby
it takes practice to make the perfect rose
and a lot more!

Cheers to baking!

Let's eat cake!
♥  michelle  

Thursday, August 22, 2013

[Tools] Oxo Good Grips V Blade Mandoline Slicer

It always amuses me when I watch a person demonstrating something in the mall or grocery store.  They make it look so easy!  I remember watching one lady do a demo about a slicer and from that moment on, I decided that I will buy one someday.  That someday is today - I bought an Oxo Good Grips V Blade Mandoline Slicer.  

There were a couple of expensive mandolines available but I couldn't imagine myself buying something worth $79 for slicing.  I love to bake and cook and it does speed up preparation time but for my purpose, I am ok with this one.

I think the designs of mandolines nowadays have changed.  They have more features like safety lock, compact design - no space wasted (love that!), adjustable thickness setting, etc.  Cool.

I haven't actually tried it yet - it's almost weekend and we don't have vegies left in our ref anymore. LOL.

Have you used one of this or do you own one?  
If so, do you like it?

♥  michelle  ♥

Wednesday, August 21, 2013

[Wilton Wednesday] Borders and flowers

Welcome to Wilton Wednesday!
This is our third class for Basic Decorating and we learned how to do borders and flowers.
Our teacher Ms. Debra taught us how to make the Wilton ribbon rose.  I think the consistency of my icing wasn't right hence the rugged edges but she taught me how to fix it.

There are a lot of icing tips and today, I learned to use more:  Wilton tips #12, 16, 18, 104, 2D, and 233.  I like making scallop borders but I need to practice putting enough and consistent pressure to come up with equal sized scallops.

I brought a small rectangular cake to class - it was the excess batter for the mango cake that I made on Sunday.  Next week is our last day and I will be bringing a styrofoam.  I don't want to bake a cake for now - I just want to decorate. LOL.

See ya next week!
♥  michelle  

Tuesday, August 20, 2013

[Tuesday Tute] Recipe: Stuffed Green Bell Peppers

Hello friends!  Today's Tuesday Tute is on cooking...

STUFFED GREEN BELL PEPPERS.

We love fresh vegetables... fresh from the garden and grown naturally.  We have a churchmate, his name is Tatay Romulo (Tatay means father) and he always gives me homegrown fresh produce.  Last Sunday, he gave me green bell peppers.

They were smaller compared to the humongous ones that you see in stores but they are sweeter.  Two years ago, I shared a RECIPE that my mother-in-law taught me.  This is a revised edition.

Ingredients:
Green bell peppers, sliced into half and seeds removed.
Ground meat - I used lean
Chopped Garlic, Diced Onions
Diced tomatoes - I used Hunts Basil, Garlic, Oregano
Tomato paste
Salt and pepper


Procedure:
1.  Wash bell peppers and preheat oven to 400 F.
2.  Place meat in a clean bowl and add the garlic and onions.  
3.  Add the diced tomatoes and tomato paste.  Season to taste.
4.  Spoon the meat mixture onto the green bell peppers and top with the tomato sauce mix.  Add a little water to the bottom of the pan and bake for 30-40 minutes.  

Enjoy!
♥  michelle 

Sunday, August 18, 2013

[Bible Verses] The grass withers and the Flowers Fade

Bestsellers come and go but one thing stands forever...
Have a wonderful and blessed week, ya'll!

♥  michelle  ♥

Saturday, August 17, 2013

[Sports] KPS 2013 Volleyball Finals!

Remember the pompoms that I showed you HERE?

Today was the finals of the season and it was heart pounding and action packed!  Our team played a good game and won 1st Runner-Up in the Gold Division of KPS 2013 Summer Coed Volleyball tournament.  We are ecstatic about it!

Our team is fairly new - practices started about 6 months ago.  This season was their first and they did really well, competing against 16 teams plus 2 more during the finals held tonight.  The majority of our male players are middle aged versus younger opponents - talk about bad knees and bad backs.  Through it all, we are grateful that we had no casualties.  It was an amazing feat!

Their team motto is:
"...playing for an eternal crown."
1 Corinthians 9:25

It was a fun event - met new friends and learned a lot of things, especially about cooking for a big group. Hahaha.
1.  I learned how to make perfect harboiled eggs (hubby and I brought about 4 dozens this season)
2.  I learned the proper way to prepare arroz caldo which is like rice porridge with chicken
3.  I have improved and tweaked my mango cake frosting
4. A lot lot more!
Photo credit:  Phi N.
I will always be my husband's #1 Fan... isn't it obvious?

It was a fun event - met new friends and learned a lot of things, especially about cooking for a big group. Hahaha.
1.  I learned how to make perfect harboiled eggs (hubby and I brought about 4 dozens this season)
2.  I learned the proper way to prepare arroz caldo which is like rice porridge with chicken
3.  I have improved and tweaked my mango cake frosting
4.  I learned how to make delicious chicken sandwich using my dear friends' recipe
4. A lot lot more!

Life is like a game.  We have to face everything with hope that we will overcome the challenges that come our way.
And of course, we have to take time to smile.

Take care, ya'll!

♥  michelle  

Thursday, August 15, 2013

[Tool Thursday] Fiskars Compact Stamp Press

Hello friends!
I love to stamp and do handmade cards and one of the tools that I love to use is the 
Fiskars compact stamp press.

This tool makes it easy to to stamp clear and cling stamps because you can put several designs, ink and stamp all at one press!  I love that the grid helps in making sure that everything is straight or center.

The base is made of acrylic with four foam "foots" that press against the paper.

I have also used this tool in adding texture to my polymer clay artwork. Pretty cool!  Makes the work easier!


Come back next week for more Tool reviews.
See ya tomorrow!
♥  michelle  ♥

Wednesday, August 14, 2013

[Wilton Wednesday] Buttercream Icing

Welcome to Wilton Wednesday!  
Today is about Buttercream Icing.

I have never tried making buttercream icing in my cakes so it was pretty interesting.  

You can find the recipe HERE.
We had to make a double batch for class:  
2 cups vegetable shortening, meringue powder, 2 lbs powdered sugar, water or milk, vanilla and a dash of salt.  
I used McCormick pure vanilla and though it didn't discolor my icing, you might want to use a brand that will not tint your icing (such as Wilton vanilla) especially if you want it stark white..

The procedure is pretty simple.  Mix all the ingredients and beat until smooth.  Add the water or milk a little at a time until the desired consistency is achieved.  I learned that there are three types of icing:  Stiff, Medium and Thin each had its own purpose.

Stiff icing is used for flowers with upright petals like the rose.  Notice that the spatula doesn't move.

Medium icing is used for stars, shells, borders, rosettes, zigzags and flowers with flat petals.  The spatula will move slightly and start to lean.

Thin icing is for printing, writing and leaves.  It is also used for icing the cake.  To test for consistency, the spatula will fall over.

 I baked a boxed cake for class... not as good as the real thing but it works for practice.

I tort the cake and filled it with this Grave's Mountain Cantaloupe Peach jam from Virginia.  Oh, it was delicious! This was given to us by friends from their trip.

I used thin icing to crumb and cover the cake.  I didn't add a lot because I didn't want to waste it and it's too sweet to my liking.  I added gel color and piped stars and swirls in my cupcake design.


I learned how to make the pearl border too.  I was fun!
Oh well... I need to practice, practice and practice some more.

A friend of mine asked me how much sugar I consume a day with all my baking and cooking.  Not too much.  The secret is sharing and spreading the joy with others.

See ya'll next week.
♥  michelle  ♥

Tuesday, August 13, 2013

[Tuesday Tutes] Hep Hep Hooray! DIY pompoms

Hello friends!
Our church's volleyball team is preparing for the play-offs this Saturday.  
This tournament is sponsored by Katy Pinoy Sports, "a Volunteer-run, not-for-profit organization based in Katy, Texas."  There were 16 teams composed of Filipinos with
"at least 25% Filipino blood or a legal spouse of a person with at least 25% Filipino blood"
(as stated in the KPS Eligibility criteria).  
The league started on July 13, 2013 and has been going on every Saturday, with 3 games per team.

Our team is #1 in the standings.  Yay!

The players have been working hard and they are
 "playing for an eternal crown - 1 Corinthians 9:25."  
They have been a blessing to us spectators and fellow players.

In preparation, I made pom-poms.  Here's how:
Materials:
     Empty roll of tissue (or any cardboard will do)
     Tissue paper - i used 10 sheets of 20' x 20" in BLUE
     Stapler and staples
     Tape - small and packaging tape

Tools:
     Scissors
     Cutter

Instructions:
1.  Stack tissue paper and fold in half so it could fit your cutting board and easier to handle.  I used a Fiskar rotating cutter.
2.  Measure 0.5 inches and cut.  I made 40 strips of stacked paper
3.  Since the tissue paper was folded in half before cutting, take the folded end and staple together.
4.  Get an adequate length of tape and wrap around the stapled bunch one at a time until you have taped 3 or 4 bunches together.  This secures the bigger bunch.  Add another tape and adhere it to the inner part of the tissue roll or cardboard.  This ensures that it will not fall off when you get wild when doing the happy dance.
4.  Wrap the cardboard around the bunch and secure with packaging tape.  The empty roll of tissue is large enough to fit perfectly in one hand.

Instructions:
1.  Stack tissue paper and fold in half so it could fit your cutting board and easier to handle.  I used a Fiskars rotating cutter which makes crafting so much easier!
2.  Measure 0.5 inches and cut.  I was able to make 40 strips of stacked paper.
3.  Since the tissue paper was folded in half before cutting, take the folded end and staple together.
4.  Get an adequate length of tape and wrap around the stapled bunch one at a time until you have taped 3 or 4 bunches together.  This secures the bigger bunch.  Add another tape and adhere it to the inner part of the tissue roll or cardboard.  This ensures that it will not fall off when you get wild when doing the happy dance.
4.  Wrap the cardboard around the bunch and secure with packaging tape.  The empty roll of tissue is large enough to fit perfectly in one hand.

There you go!
Rah-rah-rah!  Go team, Go!

Have a wonderful day!
♥  michelle  ♥

Monday, August 12, 2013

Have a Banana!

Here's a fun song to cheer you up!

Have a wonderful day!
♥  michelle  ♥


Sunday, August 11, 2013

[Verses] A Big God for a Small Me!

How are you my friend?

Have you ever thought that you carry the weight of the world on your shoulders?  That there is no end to your hardship?
That there is no hope for you at all?

Well, I felt all of that last week.

I have this knee-jerk reaction sometimes when challenges come my way and instead of facing it head-on, I tend to withdraw.  
And sob.  And cry... as if it would do me good.

Thankfully, God's word, His promises, the prayers of my husband, family and friends lifted me up.  

It's amazing how God speaks to us through His word, the Church, people and circumstances.  The theme of KHCB's broadcast last week was about worry and anxiety (and me).  Oh yeah, I believe that it was not an accident.  Nothing is.  

Friends prayed for me.  They are truly God sent.  
It's nice to pray together.  Try it if you haven't yet.

Finally, it was and will always be a comfort to know that my husband assured/s me with these words: 
"Don't worry, I will take care of you."  
Awwwww....

Then he shared with me this passage of scripture that he read during his Thursday devotion.    

Oh what a comfort to know that God will never give us something that is beyond what we can bear.

He is a BIG GOD for a small me.
Amen.

Have a blessed week, my friend!
Drop me a note and I can pray for you too.
Or better yet, we can pray together.
♥  michelle  

Saturday, August 10, 2013

[Food] Lobster Chowder

Welcome back!

A friend of ours and her family went to Boston and New Hampshire and they gave us this delicious Lobster Chowder.  It was very good - it tasted fresh and the chunks of chowder was delicious.  
Perfect for this rainy summer day.


Have a wonderful weekend!
♥  michelle  ♥

Friday, August 9, 2013

[Shop] Salcedo, Makati, Philippines Community Market

Happy weekend, ya'll!
Whew.. I love weekends especially after a long week of work.

When I was in Manila, Philippines, I loved going to the Saturday market in Makati.  It's a fun place to go to with a variety of things to do:  eat, drink, shop and explore all you want!  There are many food vendors serving their own "specialties"  and baked goodies.  What a wonderful experience!

During my last visit in 2012, my sister and I went there and saw former Mayor Lito Atienza buying organic produce.  Awesome!  When I get the chance to go home and visit the market, I will share the experience with you.

Have a wonderful weekend!
♥  michelle  

Thursday, August 8, 2013

[Tools] Speedball Lino Cutter

Welcome back, friends!      

I have always been curious at what the Speedball lino cutter is and I finally own one!  Yay!  Another tool for my craft box.

When I was in grade school, our teacher made us carve a wooden block that we inked and stamped with.  I used basic carving tols that time and I still have them in Manila.  This Speedball is pretty nice and hi-tech for me. LOL.

Now the big question is:  "What should I do with it?"
...make my own stamps
...design my own texture sheets
...make my logo / label
...cut cut cut.  Nice!

Don't you love having new tools?
Have a wonderful day!
♥  michelle  ♥

Wednesday, August 7, 2013

[Wilton Wednesday] Course 1: Decorating Basics

Welcome back to The Cabby Crafter!
We have good news for my dear readers who love to bake.  We have designated today as 
"Wilton Wednesday" 
and will do so every Wednesday until we run out of things to share with you.  LOL.

Disclaimer:  This is a personal blog of The Cabby Crafter and is not sponsored by or in anyway connected to Wilton Industries, Inc.  Thank you very much!

I have always loved baking since I was young.  My mother would bring me with her to her baking class (she's a nursing professor and took baking classes in the University where she taught) and would let me mix, use the hand mixer, crack and separate eggs and finally lick the mixer prongs.  I have baked a lot of cakes before and took a few courses on my spare time.  Did I mention that I've always wanted to have a glass refrigerated case and a bakeshop?   

My love for baking was rekindled over a year ago when I started to bake cakes for gatherings and church pot share.     Surprisingly, people besides my husband loved my cakes.  Whenever I would bake a new recipe for the first time it would always be above par - except for the icing, that is.  

I need to practice more.
And more.

One day ago, I enrolled in "The Wilton Method of Cake Decorating Course 1:  Building Buttercream Skills" at my home away from home, Hobby Lobby.  I have always been a fan of Wilton though I regret not being able to visit their office during their tent sale in Woodridge, Illinois in the 2 years that we were just an hour away from them... sigh.


The course was not cheap but thankfully, it was 55% off when I signed up - that includes the nice and colorful Course 1 book.
I had some stuff at home but of course, I had to buy the Decorating Basics Student Kit which cost $34.99 (you could never have enough tips or spatulas, my Dahlings!).

The kit included everything you need to get started (that's what the label read).
12 Decorating Tips:  Round 1,3,12; Star 16,18,21; Open Star 1 M; Petal 104; Leaf 352, Bismark 230; Drop Flower 20; Multi-opening 233
4 standard couplers
2 10-inch reusable featherweight bags
2 disposable decorating bags
6 parchment triangles
15 in Flower nail
Cupcake nail
Decorator brush
12 Flower template stickers
9 in. spatula
Practice board with stand and patterns

Our teacher, Ms. Debra was very informative.  She taught us the basics and secrets of baking, how to make buttercream icing, how to make and determine the icing consistency.  We were asked to bring cookies to practice on but we didn't have time to do it but I'm gonna practice at home.  
I will be sharing with you more about it next week.

Our take home message:  Practice, practice, practice.

This is a 2 hour x once a week x 4 week class.  Fun huh?
Come and visit us next Wilton Wednesday, okay?!

See ya!
Happy baking!
♥  michelle  ♥

Tuesday, August 6, 2013

[Packaging Ideas] Cookies in Burlap

Welcome back!  A few weeks ago, I shared with you about baking Pinipig Cookies.

Well, my husband and I sent some of it to Chicago as a birthday present to our cousin.
We placed the cookies in a plastic container and then wrapped it in burlap and tied an orange ribbon.  The cookies fit well in the container but my guess is that it crumbled during shipping.

What do you think about her birthday card?  
I stamped the image using Hero Arts Clings CG315 and added Colorbox pigment inks and embossed it with Judikins clear detail embossing powder.  I like how it turned out... the colors, dimension, gloss and all.
The sentiment is from the Hero Arts CL488 clear stamp set.

I'm into "orange" recently as seen in my projects.  
Remember the orange tulips in my mosaic challenge?

"Orange you glad we're halfway through the week?"
I am.

See you soon!
♥  michelle  ♥

Monday, August 5, 2013

[WIP] My Clay Fantasy Polymer Clay Inchies

Welcome back!
Do you remember the Polymer clay Inchies that I made for the Phil. Polymer clay guild last year?  That time, we were asked to do 4, but I ended up doing 8 because the first batch got lost in the mail.  
Read more about it here.

This time, I made 2 sets of 12 equals 24!
Oh yeah... Crazy fun!

I finished making it tonight however, I can't reveal these cute little ones yet.  I made 2 different sets with the using 2 different canes and techniques.  

These will be revealed sometime in soon.  I just have to mail them this week so they could be received by August 16 for sure.  

See ya!
♥  michelle  ♥

Sunday, August 4, 2013

[Sunday] Blessings!


May the good Lord bless and 
keep you today and always!

Have a wonderful week!
♥  michelle  

Saturday, August 3, 2013

[P3 Guild] Mosaic Challenge 2013

The Philippine Polymer Clay Guild recent;y concluded their Mosaic Challenge.  You can read about it HERE.
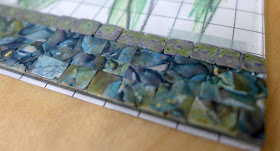
My entry was #12 - I made a 4x6" frame with the phrase:  "Hope Springs Eternal" by A. Pope.
It was my first time to make a complicated mosaic.  I started by drawing the design on a graph paper and placing it under the 4x6" glass that came with the frame.  The mosaic tiles were assembled and baked on the glass.


I used the Rocky Path technique to make the bottom layer, to make it appear organic.


The orange and yellow flowers were made from polymer canes.  These were layered accordingly.
I like the finished product - it looks like a backdrop of a cascading water fountain.


Thank you for visiting the Guild's page and this blog.
Have a wonderful day!
♥  michelle  ♥.

Friday, August 2, 2013

[Focus on Life Week 31] Hues of Blues

Hi!  It's Week 31 over at Ms. Sally Russick's Focus on Life and the prompt for this week was:
"Hues of Blues."


Let me share with you these special Origami Papers.  I love the rich, vibrant and assorted hues of blues!  these would look really good in origami projects, or as a pendant or in a handmade card layout.  Woohooo!

There are different types of origami paper:

Kami - it is the basic, easiest and cheapest to buy.  It is thin, printed on one side and is easy to fold.
Origamodo - which means "way of paper folding" is handmade paper specially created by 
Micheal Lafosse.
Paper-backed foil - it is more expensive, flashier and is good at retaining creases.
Washi - thick handmade paper usually made with long fibered and soft paper.
Chiyogami - it is an inexpensive substitute for Washi paper.

Thank you for stopping by the blog.
See you soon!
♥  michelle  ♥

Thursday, August 1, 2013

[Necklace] Colorful Fabric Pendant

Hello August!

Here's a happy and colorful necklace fresh from my craft table.

Have a wonderful day!  
Hang in there... the weekend's almost here.

Blessings,
 michelle  ♥