Showing posts with label Tutorial. Show all posts

Tuesday, April 1, 2014

[Tutorial] DIY Happy Birthday Banner

Wow, today is April Fools Day and it marks the start of my birth month.  Yipee!  Oh yeah...  
Happy Birthday to Me!
DIY Birthday Banner
This is a handmade banner that I recently made for a friend while watching "Castle."  Yes, I usually make crafts while listening to music, watching a tv series or a movie.  Don't you?  Tell me about it.  

So, let's start!  Here are the materials and tools that you will need:
Cardstock - I used 2 shades of Teal and Kraft cardstock, 3 pcs
Glue, Tape
Twine

Tools:
Cricut machine and a font (Cricut Base Camp) cartridge
Martha Stewart scoring board
Martha Stewart centering ruler
Fiskars rotary cutter

Steps:
1.  Determine the size of the letters that you want for your banner - I used 4 inches in this particular project.  You may print the letters manually or use a cricut or a similar machine - I used cricuts' Base Camp font here. 

 2.  Prepare the banner by cutting cardstock into 3.5 x 8 inches.

3.  Adhere the letter, making sure it is centered.
 

4.  I measured 1.5 inches from the bottom of the banner, got the center and cut one corner to the center, creating an inverted "V" shape.  You may adjust the height according to your preference, that is, depending on how long you want the tail to be.  I love using my MS centering ruler because it makes it so much easier,
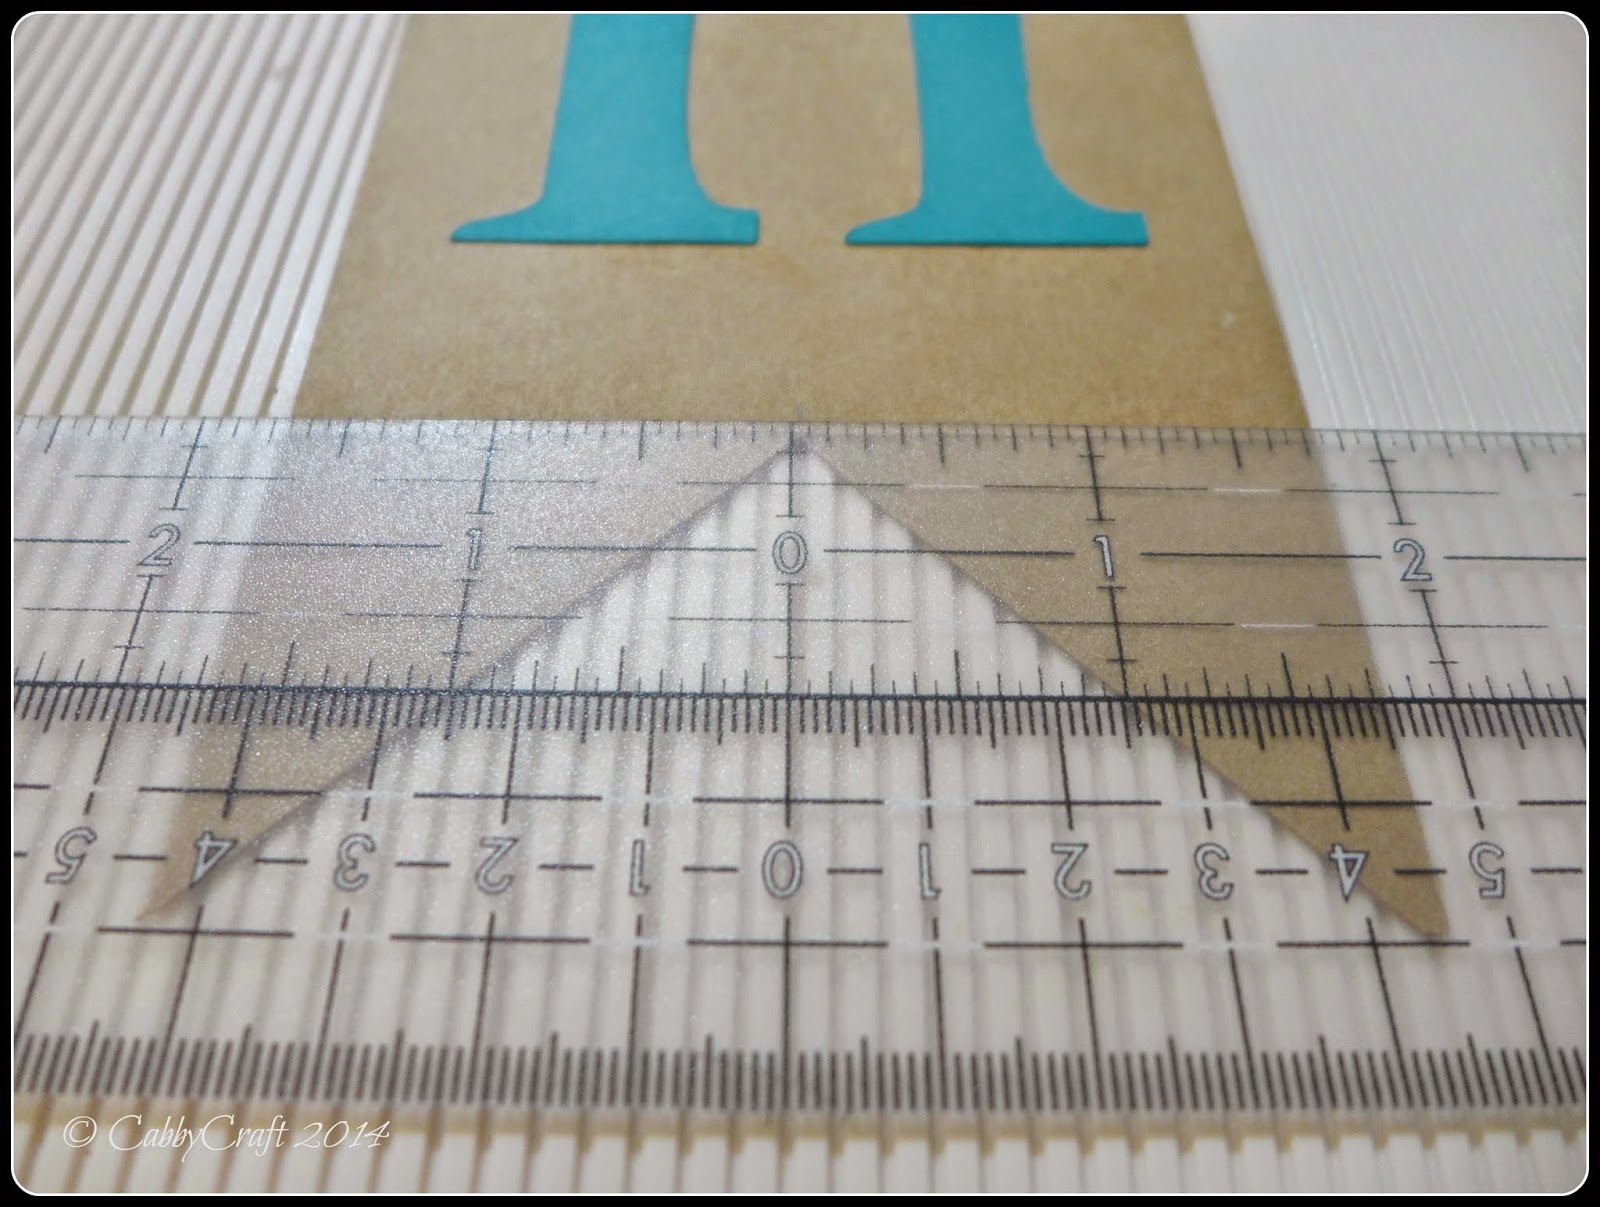
 5.   To make the top flat for the string, measure 0.5 inches.  Score and fold.
6.  Fold the top flap and secure it with an adhesive or tape.  I used hemp cord because the party theme for this project was kinda rustic.


That's all, folks!  It didn't take long to make and wasn't costly at all.  Come back soon to see how we made used of this.  Enjoy!

Happy crafting!
michelle


Wednesday, June 19, 2013

[Tutorial / Tips] Using Embossing Folders as Texture Plates for Polymer Clay

I have accumulated quite a number of tools in my craft room and I organized them depending on whether it's for papercrafting, cardmaking, jewelry making, or for polymer clay projects.  

The photo below shows some of my embossing folders from Sizzix and cuttlebug (I have smaller dies too from Vintaj) that I use in making my cards.  It occurred to me that I can use it for texture for bigger projects (duh)!
Embossing Folders:  Sizzix and Cuttlebug
Many polymer clay artists use stamps, get a negative image of it, cure accordingly and use it for their polymer clay project.  Well, I want to cut a few steps, save a little time and money.  I used Prmeo clay - it holds the texture pretty well.
Acrylic stamp from Inkadinkado

Embossing folders have 2 sides:  positive - with the raised design and negative - raised background.  I cut 2 circles - 1 thick and 1 medium thickness polymer clay and pressed it against the negative side of the folder (I sprinkled a little constarch as release).  The clay was then cured according to the manufacturers' instructions.

The photo below shows how well defined the stamped embossed images are.  These can now be used as texture plates for pendants, mokume gane technique, etc.

You can also use different materials to make all kinds of texture sheets... explore and have fun!

Have a wonderful day!
♥  michelle  

Monday, June 17, 2013

[Post Tutorial] Bettina Welker's Pixelated Retro Blend Cane

Happy Monday!  How was your weekend.  Mine was great - I was able to organize my craft room a little, with only a couple of storage bins to go through.  I still have to decide whether to do an inventory of all my supplies but it's too tedious to count or weigh my beads plus I wanna hang out, watch a movie and play video games with my hubby.  
As long as it's below my budget, we are fine with that (wink! wink!)

Have you heard of Ms. Bettina Welker's "Pixelated Retro Blend?"  Here's a photo from her website with a FREE tutorial.  Thank you for sharing your "aha moment" technique with us, Bettina.  Much appreciated!


photo credit from HERE

We had our local guild meeting last Saturday where we talked about this technique and when I got home, I took out my clays and Makin's extruder and tried it out.  The first thing I did was to figure out which colors to use.  I thought of using Premo Purple and Turquoise and make "in-between" color blends.  Bettina suggested having 5 different shades plus black and white.  In making different shades, I used a cookie cutter to measure equal amounts of clay, cut 4 circles and replacing some circles with the other color, then mixed them up.  The shades where too subtle or "close" to each other which is why I will use colors that would have a better contrast next time.   

The other problem I had was that my cookie cutter was a tad bigger than the Makins barrel.  I tried to use the end of the barrel to cut the circles out and it worked. however, be careful not to distort it upon taking it out.  Following Bettina's tutorial, I arranged the circles as follows:  white, 2 colored circles, black, 2 colored circles then repeat until the desired length to fit the barrel.  I placed the purple side first, as per the instructions.

To extrude the clay, I used 2.5 mm circle disc and extruded a good length of clay.  This was the pattern that was formed (kindly refer to photo below).  Then, I decided to slice thin veneers to cover my small altoid tin.  I applied a thin layer of black clay then the veneer.  This was baked in the oven for about 20 mins, sanded and buffed to a medium sheen. 
Pixelated Retro Blend Cane
Bettina Welker
So what do you think?
I still have to finish the bottom part of the tin but I think I will keep it plain.  There are rooms for improvement for me - my canes have been slightly distorted when slicing - I blame the heat over here because it softens the clay too much.

Thanks for stopping by the blog and have a wonderful week!

See you soon!
♥  michelle  ♥   

Monday, June 3, 2013

[Post Tutorial] Rocky Path Pendant

One of the things that I am grateful for in this era of hi-technology is the ability to research for different stuff without getting off my computer chair for a long time.  As artists, I bet you have experienced looking at a website that leads you to another and another and another.... then you realize that it's dinner time or worse, you hear the rooster crow (tik-ti-la-ok in the Filipino language).

I have purchased a couple of tutorials recently and one of them is the Rocky Path tutorial by Ms. Christi Uliczny.  It was first time to purchase a tutorial from ETSY and was very pleased with it.  The photos and instructions downloaded as soon as my payment was cleared.  They were very clear and descriptive, the photos very helpful as well.

This is the first piece that I made using a different texture plate and set of inks.  I used Premo clay and I love it!

The finished piece looks pretty and feels smooth in reality.  I didn't use any surface treatment or gloss - the high sheen was brought about by sanding through several grits of sandpaper and buffed to achieve the glossy, glass-like finish.  Gorgeous!

I will be making pendants and bead components using this technique.  
More updates on this soon.

Have a wonderful week!
See ya!
♥  Michelle  ♥

Wednesday, November 2, 2011

Tutorial: Making Perfect Wire Loops

When I started making jewelry, I hated making wire loops.  My teacher made perfectly round loops that looked so easy but mine were always oblong with dents on the wire from too much uncoiling. 
My beginner loops were never perfectly round.
Practice... practice... practice... (not to mention callouses on my fingers).

Tools and Materials
Flat / Chain nose pliers
Round nose pliers
Wire cutter
Wire or headpins -  I used 1 inch head pins
Beads -  Make sure that your bead/s leave enough wire for you to work with

Steps (kindly refer to the photos):

Insert the bead/s into the wire then with the chain nose pliers, create a right angle bend.

With the round nose pliers held in the horizontal position, grab the wire leaving about 15 mm and twist to make a circle around the jaw of the pliers.  You may adjust the size of the loop by adjusting the pliers (narrow tip and broad base).

When you read the halfway point, reposition the round nose pliers to a vertical position and complete the loop.
Insert the chain, connector or whatever before completely closing the loop.


It entails one smooth wrist movement.  With practice, you will make perfect loops and when you do, you will be addicted to it.

There are days when I just want to make loops and it really becomes handy during times when I am in a hurry to finish a project.


Loop away!
Oh, don't forget to wash your hands after handling too much wire and moisturize those creative hands.

Happy crafting!
Enjoy!


Tuesday, October 25, 2011

Twist and Turn [Makin's Clay Extruder Tutorial]

Yay!  I have a new tool for my polymer clay adventure:  a Makin's Professional Ultimate Clay Extruder.  There are many blogs and articles on different brands of clay extruders, stating the pros and cons between the brands.  I was surprised to read that for some brands you have to get a caulking gun to help extrude the clay.  When I saw and read about the Makin's clay extruder, I decided to give it a try.

The Makin's extruder is color green and has a ridged surface which aids your grip during use.  It includes 20 discs with different shapes including square, round, flat, and screen discs.  You can use it to make hair, ribbon, weaving, beads, etc.

I have always wondered how to make canes without having to mix too many clays, rolling, reducing, etc.
Here's a tutorial on how to do that using a clay extruder. 

First, condition different colors of clay (I used Premo' turquoise, alizarin crimson, black and beige clay) and cut them with a round cutter. 
Put them inside the clean  barrel of the clay extruder and use a square disc.  Extrude the clay and be amazed at the color combinations.

TADA!


You should see my face when I saw the resulting color combo.  This was an awesome technique.

Do come back to see what I've made with these pretty babies.

Happy crafting!

Enjoy!

Monday, September 5, 2011

Let's Play with Clay Part II [Polymer Clay Adventure Series: Tools]

Hello friends!
This is Part II of Cabby Crafter's Polymer Clay Adventure Series.  You may read about Part I HERE.

Do you love tools?  I do, I do I do!
Every craft and hobby has it's own set of tools - whether you're into papercrafts such as scrapbooking and card making, sculpting, painting, jewelry making or polymer clay.

Being a newbie in polymer clay was exciting because I got to buy tools.  Actually, you just need a roller, an x-acto knife or blade and a good worksurface such as a tile.
However, if you want to be more efficient about it, it's nice to have a little more.
The clay rolling machine for instance makes conditioning clay faster, producing uniform thickness.
Clay cutters makes cutting shapes a breeze!


Since polymer clay projects can have so many details, it helps to have piercing and shaping tools.  Basically, you can use anything that you can find around you to create texture or shapes.  Go wild with your imagination.  Here are some of the tools that I often use.
To add depth and texture to polymer clay projects, use rubber stamps, texture plates, metal stamps, dye inks, mica powder, extra fine glitter, glze, chalk and acrylic paints.
There are many tips from other bloggers and the more senior polymer clay artists out there.

Everyday is a learning experience for me and I have yet a lot to learn.
Perhaps, by the time I do a sequel to this post, I'd have a room full of tools, haha!

Happy Claying!

Thursday, September 1, 2011

Let's Play with Clay! [Cabby Crafter's Polymer Clay Adventures Series]

A few weeks ago, I started to write about my adventures in polymer clay.
If you want to get more creative in making art beads or sculpture, try playing with polymer clay.  In the coming series of blogs, allow me to share with you what I've read and learned from my own experienced in the hope of encouraging you.
There are several brands of clay in the market that have slight differences from one another.
We used one polymer clay brand during my training in Manila.  Here in the U.S., I realized that there were so many to choose from:  Kato polyclay, Polyform products such as Sculpey and Premo sculpey, Fimo by Staedtler, Cernit, etc.  Donna Kato's book "The Art of Polymer Clay" gives a detailed description of each brand.

I have tried working with Kato, Sculpey 3 and Premo sculpey.  There is a noticeable difference in how each brand of clay feels.  The Kato clay was firm and really great for making canes because the layers of clay remain defined and do not "bleed" on each other.  It just needed more patience in conditioning to make it soft; I had a great time making these roses - the petals maintained its beautiful forma nd texture. 
Kato polyclay primary colors
 The next brand I tried was sculpey 3 in dusty rose.  It was the clay that I used when I made the asymmetrical rose necklace.  It was soft and easy to condition however, I discovered that I had to let it rest and cool to allow it to harden once in a while.
Sculpey 3 Dusty rose
Premo' sculpey is soft and easy to blend but it is firm enough to hold its form when used with techniques such as caning and mica shift among others.  I love the range of colors that Polyform has in this line especially the Accent colors.  There are many more colors to available and I am looking forward to trying out each one.


Locket made using Premo sculpey

I have yet to try the other brands like Fimo. 

Stay tuned for the next Cabby Crafter Polymer Clay adventure. 
Be creative.  Have fun!