Friday, March 25, 2011

Jewelry Sneak Peak

You may have noticed that I have been off for a long hiatus from blogland.  Well, things have been quite busy since I began my vacation in my native land - after 10 months of anticipation, I was once again able to do my duties as a Medical Doctor.  I attended to several "oriental medical missions" and took care of my cute little patients. 

After all that work, I was able to put my attention into crafting.  It was nice to be a student once again as I learned the art of Jewelry making.  Oh, it was great!  We had several projects and I just can't wait to show you some of them.  Oh yeah, what a thrill!


More to come soon...
Happy beading!

Tuesday, March 8, 2011

Cricky Birthday Cards

I am now on a long vacation away from my craft nook and since many of my lovedones are celebrating their birthday this month of March and April, it was busy days before my trip.
Here are a few birthday cards that I made.

I used the "Birthday Blessings" sentiment from the George and Basic Shapes cricut cartridge, played around with different sizes (1.5 to 3 inches) and background matting.

This card is for my sister.  I added a cuttlebug embossed matte in yellowgreen paper and layered it on a cream cardstock.  The card looks so gorgeous and feminine, just like her.

This olive green card is for my mom's 69th birthday.  I added a "gift" cricut image and layered it on a DCWV design paper.  Great combination!  Beautiful, just like mom.

This card is for my dad who is celebrating his 70th birthday.  It is always a challenge to make cards with a "masculine" feel.  My dad loves gardening and listening to the birds chirp outside their bedroom window so it was nice to incorporate them in a card. I used a DCWV design paper for the background, matted the sentiment on a dark blue cardstock and attached them using dimensionals.  Hopefully, this would "chirp" him up ☺.

This one is for my mother-in-law who abhors furry creatures called mice and when I saw this DCWV design paper with this cute creature, I knew in an instant that it was for her.  The cricut sentiment makes the card pop.  Overall, I find the card cute, adorable and funny just like her.

This last card is for my brother-in-law's birthday in April.  This is a simple card with a DCWV woodgrain background and a cricut birthday sentiment.  Oh, I added stitching all around the card after I took this photo.  It may be simple but made with all sincerity and love.

Happy birthday to all of you!

Did I mention that I love my cricut machine?  I do, I do!

Monday, March 7, 2011

Crafty Traveler

Have I told you that I love to travel?  Long airplane flights may be boring and tiring but somehow I manage to entertain myself by watching movies and playing games.
For the past 2 years, I had been flying to and from the US with a 4 to 6 hours stopover at Korea's Incheon international airport.  Thankfully, Incheon airport offers a lot to see and do.
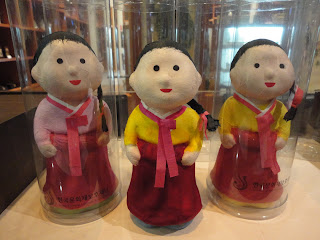
I have tried wearing the traditional Korean costume - the hanbok, make their headband - baessi, dye stamp using a convex roof tile with lotus design, wall decor and cellphone accessory using the traditional Korean paper called Hanji which is derived from mulberry trees.
During my recent trip, I was able to decorate a cute doll using Hanji paper.


Aren't they adorable?  They make me smile.

I am looking forward to my next trip through Incheon.
Happy crafting!

Thursday, March 3, 2011

Dessert Favorite [Tiramisu]

I love eating desserts and so does my husband... what a treat, huh?
One of our all time favorite is Tiramisu.
It's a simple dessert to make but oh so fattening especially if you end up eating the entire pan.  I found this recipe from Giada de Laurentiis through the food network.

Ingredients:

6 eggyolks
3 Tbsp sugar
1 lb mascarpone cheese
1 1/2 c strong espresso coffee
2 teaspoons dark rum
24 packaged ladyfingers
1/2 cup bittersweet chocolate shavings, for garnish
cocoa powder, for garnish
Directions:
With an electric mixer, beat the 6 eggyolks and sugar until creamy, thik and pale.  Giada recommends beating for about 5 minutes. Add the mascarpone cheese and beat until smooth.  Add 1 tablespoon of espresso and mix until thoroughly combined.

In a deep pan, dip each ladyfinger into espresso-rum mixture for only 5 seconds (soaking too long will cause them to fall apart). 
Place a little eggyolk-mascarpone mixture on the bottom of the pan.  
Arrange the soaked ladyfinger on the bottom of the pan -  I used 2 small rectangular pans, consuming about 16 ladyfingers in each pan.

Spread 1/2 of the mascarpone mixture evenly over the ladyfingers. Add another layer of soaked ladyfingers and top with remaining mascarpone mixture. Sprinkle with cocoa powder and/or shaved chocolate.

Hubby is uber excited to share this with me.  It's my last 3 days before my 2 month vacation outside the US. 
Until next time.... happy baking!