Friday, September 30, 2011

Alcohol Inks + Polymer Clay = FUN!

Alcohol Inks + Polymer Clay = FUN!

Yes, my sister-in-law and I had fun today.  I had a mini-teaching session with her on the basics of polymer clay.  Actually, I just taught her how to condition, roll and stamp on polymer clay.

She bought her Adirondak Alcohol Inks hence, it was our first time to use it on clay.
I conditioned Premo Sculpey White clay and rolled it in the thickest setting of the machine, stamped with an Inkadinkado square floral stamp, added a butterfly finding and finally baked.

After baking, I used Ranger's Adirondak Nature Walk Alcohol Ink Set to add color.
It was helpful that I used cotton pledgets to avoid being messy. 
Just like what I've read in several blogs, alcohol inks really evaporate fast and they have a way of surprising you with how the color will turn out when mixed.  Cool!

When the alcohol ink was completely dry, I added Burnt Umber Acrylic pain to highlight the design.
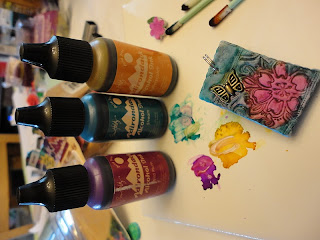
This photo shows the detail on the side.
The piece was small enough to be a pendant so I made a wired bail.
The piece was layered on a Premo spanish olive clay and stamped with a sentiment that reads:
"To Nanay, With Love... Bing"
Nanay means "Mother" in one of the Philippines' native dilalect.

I gave this pendant to my mother-in-law who is like my own mother.
It thrilled me to see her attach it on a chain and wear it.

There will be more projects using alcohol inks next time.

Do you have tips to share on alcohol inks?

Wednesday, September 28, 2011

Chalk Pods [Inspired by Shirley Rufener]

Don't we all love reading craft books, being inspired by the beautiful projects and awed by the nice photos?  Today, I will share with you a project that was inspired by the book: 

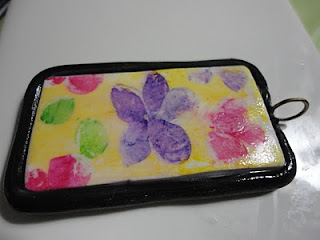
I bought a box of Faber Castel chalk pastels and have been eager to use them in a variety of polymer clay applications.  Shirley wrote about a project where pastels were used to add color to the polymer clay.  After conditioning Premo sculpey in white in the thickest setting of the clay conditioner, I used the pastels to make 3 color palettes using green, pink and purple shades.


Then, I scooped out the colored clay and layed them on a conditioned and colored base clay.   

  The book suggested overlapping the "pods" of clay to have more texture but I did this test project with just 1 layer. When all the petals and leaves were set, I rolled the clay with an acrylic roller and then with the machine in its' thickest setting.


Note that the edge of my petals looked so messy, especially after running it through the machine.


I used a rectangular cutter to trim the edges. 

My first attempt doesn't deserve a "Tada" moment but I loved the technique... more practice.
Sans the not-so-pretty outcome, I went on to bake and finish it. 
I conditioned black clay for the base, added wire, layered the image, and a black border.

Here it is... varnished, sloppy, smudge and all. 
Please bear with me.

I will practice this technique and give justice to Shirley Rufener's hard work in making her awesome book.
Until next time...

Sunday, September 25, 2011

Christmas in the Air [2011 Christmas Cards]

90 DAYS 'TIL CHRISTMAS!

The air is way cooler and the leaves are not as green as they used to be.
Yup... it's fall.  Pretty soon, the time will fall back by 1 hour and Christmas carols
will be heard over the radio once again.
Christmas is near!

I started making Christmas cards because it takes 45 days to ship our gift box.

I used the Nativity stamp from Inkadinkado.  The embossed leaf background is from cuttlebug 
Crayola colored pencils were used to highlight the design.  The sentiment reads:
"May the spirit of the season warm your heart all year long."


These gift tags were also from Inkadinkado.  Aren't they fun?
I colored them with Tombow ABT markers.

Got to head to the store and get more gifts.
Have fun!

Friday, September 23, 2011

Color blending with Polymer Clay [Skinner Blend]

Any form of art begins with a basic color scheme.  This determines the impact of the finished piece.  Different Polymer clay brands offer a wide spectrum of colors but you can come up with your own.

Clays may be combined to produce a pretty graduation of colors.  This technique is the Skinner method developed by Ms. Judith Skinner.

This is my attempt in doing this technique.
I used Premo' Sculpey's Green and Sunshine polymer clays.
Condition the clays separately, starting with the lighter colored clay and cut in triangular shapes as such:

Note that the triangles are offset in one side.  You will later see why.

Fold the clay in half - green to green and yellow to yellow. 
Run through the clay conditioner on the thickest setting folded side first (to avoid bubbles)

You will notice that as you fold and roll, the colors will blend.

This is what my clay looked like after about 15 "fold and roll" sequences.
See the beautiful graduation of the colors?
Love it! 

Once you're satisfied with the blending, you may run the blended clay through the clay conditioner
lengthwise.  I set my machine on the 3rd to the thickest setting (that's #6 on the Amaco machine). 

Depending on your project, you may opt to roll it from either side (from light to dark or dark to light).
Remember the offset sides at the beginning of the Skinner?
It produces a solid/original color both edges of the blended piece.
Awesome, huh?

I decided to use this particular skinner blend as is:
Stamped.
Set on black polymer clay,
Painted to accent the design.
Polished and Varnished.

TADA!
This could be a pendant combined with beads on a 26" chain.
Or a component for a keychain.

Come and visit me next time for  more techniques!

Thursday, September 22, 2011

My burning desire [The polymer clay adventure continues]

Experience is indeed the best teacher.

I just want to share with you my burning desire for polymer clay art. 
Seriously... I want to show you the first few products of my baking 2 months ago.

My teacher taught me well but experience is the best teacher.
For the lack of a convection oven, I used our once-only used oven toaster and bought a new oven thermometer.
There are many books, blogs and articles on the web that give instructions on proper baking and they are all correct in saying that "You should know your oven...  Oven toasters are tricky...  Bake by using one brand of clay...  Test your oven to avoid mishaps."

I did a lot, if not all mistakes on my first try: 
1.  I didn't test the oven toasters' temperature beforehand.
2.  I set the thermostat to the required temperature (130C/275F) without checking the
actual internal temperature using the oven thermometer.
3.  I used 2 different brands of polymer clay (Sculpey and Kato polyclay) 
that required different temperatures for curing.
4.  I set a separate timer for 15 minutes without monitoring the baking process. 
By the time I checked it, it was burnt!  It was good that I baked outside the house, open air and all because of the fumes.  Yup, I know that the fumes are toxic so I panicked!

Here's the outcome:

Here are the things that I learned and suggest to you if you are a clay newbie:

1.  Check and test your oven to see if the thermostat is the same as the internal temperature.
2.  If you are not confident about your oven, closely monitor the baking process.  Otherwise, all your hard work will go to ashes (no pun intended).
3.  Kato polyclay has a higher tolerance for burning than Sculpey as stated in it's higher curing temperature.  The big flowers were made using Sculpey and the small red and yellow roses were made using Kato polyclay.
4.  Don't be afraid to try and learn from your mistakes.

Since then, I have never burned any of my baked polymer clay projects.

Now, my burning desire for polymer clay continues!  YAY!


Wednesday, September 21, 2011

His & Her's ArtBin Sidekick

Last week, I wrote about hubby's Macho Crafting and his new ArtBin Sidekick for his paints.

HIS ArtBin
He bought me one too and I am obsessed with it!
It's now my clay caddy and is home to my polymer clay blocks,
tiles, tools, blades, inks, pastels, stamps, brushes and more.
HERS
I like being able to take the tray out of the box, making it easy to choose and change colors.
The tray can fit 42 blocks of 2 oz polymer clays.

The funny thing about enjoying different crafts is that I get to organize them separately but at the same time, I can interchange tools and materials such as stamps and inks.

Don't you love organizing?

Monday, September 12, 2011

Macho Crafting

My husband and I have been visiting craft stores together for the past 3 weekends. 
We walk holding each others' hand towards the store entrance and then... we go our separate ways. 
It's nice that these stores have items for men too.  My husband, being the ex marine and handyman that he is, loves assembling model cars and trucks.  During trip to the store, he bought not just 1 but 2 tanks and lots of Apple Barrel craft acrylic paint. 

With the numerous paints that he bought, of course he needed a hardcase and wow... he found and bought an Artbin sidekick case.  Ayayayyy... it made me so envious so after flashing my puppy eyes, he bought me one too for my clays and tools.

He was working on the tank last weekend when I caught him scouring through my tools.   Aha!
Being the supportive and loving wife that I am, I told him to use my jewelry tweezers, diagonal cutters, knife and my self-healing craft mat.
Would you believe that he even made a lazy daisy to use for spray painting?
Awesome!  Perhaps he could make one for me too.

Definitely fun!

"The couple that crafts together stays together."

Saturday, September 10, 2011

Weekend Treat

Yay for Saturday!

Here's a photo that describes how happy I am!

Icing a Cupcake the first tme

Have a great weekend!


Tuesday, September 6, 2011

Classy vintage bracelet [Stamped polymer clay]

Hello friends!

One week ago, I blogged about my experience with Sculpey Satin Glaze.  I wrote Polyform products about it and they advised me to stir (not shake) the contents prior to application.  Thanks to their reply to my seemingly basic question, I am excited to glaze again.


Anyway... So here's what I made from those polymer clay beads:


I love the color of Premo' sculpey's Turquoise!  I made a 7 inch bracelet using brown czech glass beads, pearls and crystals.  This bracelet looks so vintage, with the brass findings, wire and lobster clasp.


This pink bracelet is 7 inches and also has a vintage feel to it.  It used simlar beads as the previous one but the design is different.  There is a surprise at the back of the filigree!  Tada! 
I added a stamped sentiment which can be customized for that
very special someone.

As always, this was 100% handmade with love and joy.
Happy claying!

Monday, September 5, 2011

Let's Play with Clay Part II [Polymer Clay Adventure Series: Tools]

Hello friends!
This is Part II of Cabby Crafter's Polymer Clay Adventure Series.  You may read about Part I HERE.

Do you love tools?  I do, I do I do!
Every craft and hobby has it's own set of tools - whether you're into papercrafts such as scrapbooking and card making, sculpting, painting, jewelry making or polymer clay.

Being a newbie in polymer clay was exciting because I got to buy tools.  Actually, you just need a roller, an x-acto knife or blade and a good worksurface such as a tile.
However, if you want to be more efficient about it, it's nice to have a little more.
The clay rolling machine for instance makes conditioning clay faster, producing uniform thickness.
Clay cutters makes cutting shapes a breeze!


Since polymer clay projects can have so many details, it helps to have piercing and shaping tools.  Basically, you can use anything that you can find around you to create texture or shapes.  Go wild with your imagination.  Here are some of the tools that I often use.
To add depth and texture to polymer clay projects, use rubber stamps, texture plates, metal stamps, dye inks, mica powder, extra fine glitter, glze, chalk and acrylic paints.
There are many tips from other bloggers and the more senior polymer clay artists out there.

Everyday is a learning experience for me and I have yet a lot to learn.
Perhaps, by the time I do a sequel to this post, I'd have a room full of tools, haha!

Happy Claying!

Thursday, September 1, 2011

Let's Play with Clay! [Cabby Crafter's Polymer Clay Adventures Series]

A few weeks ago, I started to write about my adventures in polymer clay.
If you want to get more creative in making art beads or sculpture, try playing with polymer clay.  In the coming series of blogs, allow me to share with you what I've read and learned from my own experienced in the hope of encouraging you.
There are several brands of clay in the market that have slight differences from one another.
We used one polymer clay brand during my training in Manila.  Here in the U.S., I realized that there were so many to choose from:  Kato polyclay, Polyform products such as Sculpey and Premo sculpey, Fimo by Staedtler, Cernit, etc.  Donna Kato's book "The Art of Polymer Clay" gives a detailed description of each brand.

I have tried working with Kato, Sculpey 3 and Premo sculpey.  There is a noticeable difference in how each brand of clay feels.  The Kato clay was firm and really great for making canes because the layers of clay remain defined and do not "bleed" on each other.  It just needed more patience in conditioning to make it soft; I had a great time making these roses - the petals maintained its beautiful forma nd texture. 
Kato polyclay primary colors
 The next brand I tried was sculpey 3 in dusty rose.  It was the clay that I used when I made the asymmetrical rose necklace.  It was soft and easy to condition however, I discovered that I had to let it rest and cool to allow it to harden once in a while.
Sculpey 3 Dusty rose
Premo' sculpey is soft and easy to blend but it is firm enough to hold its form when used with techniques such as caning and mica shift among others.  I love the range of colors that Polyform has in this line especially the Accent colors.  There are many more colors to available and I am looking forward to trying out each one.


Locket made using Premo sculpey

I have yet to try the other brands like Fimo. 

Stay tuned for the next Cabby Crafter Polymer Clay adventure. 
Be creative.  Have fun!