Tuesday, December 25, 2012

[Card Ideas] Merry Christmas!

MERRY CHRISTMAS, YA'LL!

Hello, friends!  This is our first Christmas in our apartment and we had fun decorating.  A good friend of ours gave us an IKEA Pendant light which came in very handy since I made a wreath instead of a putting up a tree.  It worked out pretty well with the lights - I loved that it could be hung or used as a wall or table decor... cool!

We received several thoughtful cards this year - it was nice to keep in touch and read updates from friends and family.  I arranged the cards on our living room table so we would see them every time we walked by.
Tablescape of Christmas Cards
These black framed canvasses were painted by my husband a couple of months ago and hangs above our TV system.  It used to be plain but I decided to showcase some of the cards that we received.  It's pretty simple.... I bought the framed canvas from Michaels, painted them with black acrylic paint and added strips of ribbon on the back.  The cards were attached using masking tape.

Wall-mounted cards

I was also able to display my handmade Christmas manger ornament made using polymer clay.  These blank canvasses can be used to showcase both everyday and seasonal cards.  It's just a nice way to be reminded of friends and loved ones.  Try it!  

Christmas ornaments may be
displayed too.

Finally, I found this adorable couple from Walgreens.  They're so cute and cheerful!

Merry Christmas!
Have a wonderful and blessed Christmas, my friend!
Let us remember the birthday of our Saviour and Lord, Jesus Christ.

Know that you are blessed!
Michelle

Saturday, December 1, 2012

[Ornaments] Christmas Manger

Hello there!
At the start of the year, I told myself that I'd make handmade cards and gifts for Christmas.  Time seemed to fly so fast... I wasn't able to make 1/8 of what I planned to do.  Not good!

I made these Ornaments using Premo polymer clay, stamps, alcohol inks and acrylic paint.  Christmas is my favorite season of all because it's a celebration of the birth of Jesus Christ, the Reason for the Season.

John 3:16 says:  "For God so loved the world that He gave His one and only Son, so that whoever believes in Him will not perish but have eternal life."

This manger stamp is from a clear stamp Christmas set from Inkadinkado.  Ranger's alcohol inks and acrylic paint were used to add color.


I used renaissance wax in some of the pieces and LP's UV gloss in a couple.
The piece measures 3 inches in height.  I drilled a hole in the middle and attached a ribbon so it could be hung in the tree.

Christmas Manger Scene
Did you make a lot of handmade crafts this year?

Know that you are blessed!
Michelle

Friday, November 30, 2012

[Baking] Canonigo / Ile Flottante

Are you one of those who find themselves in the dessert table more than the sumptuous buffet spread?
If you are, I would like to welcome you to the club, my club!

I particularly love creamy desserts and one of them is a Filipino dessert called:  "Canonigo."  My first taste of it was in a Spanish restaurant in the Philippines called "Alba's" where they served it with sweet mango balls. It is made of a soft, egg white based cake (meringue) that is topped with a creamy custard.  The French have a similar dessert called "Ile Flottante" or floating island.  I don't know where the dessert originated but I am just thankful to them for coming up with it!


This post tells about my first attempt and it was pretty good.  
This recipe is from Nora and Mariles Daza, with a few revisions (*).

CANONIGO
Ingredients:      Meringue        8 eggwhites
                                              1/2 cup white sugar
                                              1/2 teaspoon baking powder

                        Caramelized sugar            1 cup white sugar
                                                                1/2 cup hot water

                        Custard          8 eggyolks
                                              1 cup evaporated milk
                                              1/4 cup white sugar (*)
                                              1 tsp vanilla extract
                                              1/4 cup rum (*)


I caramelized the sugar first.  Just be super careful in pouring the hot water when the sugar has completely melted and changed color - it will bubble.

I used 2 loaf pans but you can use any pan with a solid base.  Line the pans with the caramelized sugar and butter.

In a bowl, beat the eggwhites (I used an electric handheld mixer) until soft peaks form.  Gradually add the sugar and baking powder and beat until the eggwhites are very stiff.  Gently pour the meringue in the molds halfway and bake in a pan with water at 350F for about 30 minutes or until brown.

The custard sauce is cooked using a double broiler.  Whisk and cook the eggyolks, sugar and milk until it thickens.  Add the vanilla and rum last.   Serve on the side.


Try it out and share your wonderful stories with me. 
 Warning:  You definitely have to share this deliciousness with others.

Have fun!  

 Michelle  ♥                                     

Wednesday, October 24, 2012

[Cooking] Japchae - Korean noodle dish

Aneyong haseyo.
Have you ever seen a korean drama?  My husband and I love to watch (and read) because how neat, realistic, funny and educational they are.  We've seen a couple of k-dramas that featured their cuisine thereby influencing our taste buds.

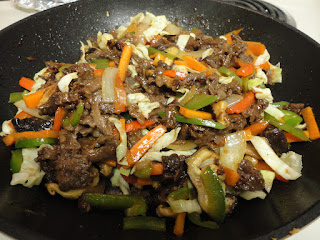
This was my attempt to make Japchae which is a noodle dish.
We have several Filipino noodle dishes, called Pansit but it was my first time to cook using Potato starch noodles.  

Ingredients:  
Potato starch glasss noodles
Red and green bell pepper
Cabbage 
Dehydrated mushrooms, and
Marinated thinly sliced beef.  

Soy sauce, sesame seed oil, salt and pepper to taste.

The procedure is very simple:  saute the beef and cook thoroughly.  
Add the vegetables but do not overcook.
For the noodles, bring water to a boil, add the glass noodles and cook per package instructions.  

Once cooked, add a little sesame seed oil and toss the noodles.


Place the sauteed mixture over the noodles and enjoy!


Enjoy your Korean food trip with a glass of barley tea.  YUM!
Kamsamnida!

♥  MICHELLE  ♥

Monday, October 15, 2012

[P3 Guild] The Mask has Bloomed!

 The mask has bloomed!  

The gold base served as a nice "neutral" template for these colorful flowers... if you've been reading my blog, you know by now that I love to make use of floral themes.


This is for the princess who's going to the ball.  
Simple. Classy. Feminine.

Time to go dancing!

♥  Michelle  ♥

Wednesday, October 3, 2012

[P3 Guild] W.I.P.

I'm so glad you're back!

When I started reading blogs and updates of other artists, I didn't know what "WIP" was.  Funny me but there are just a lot of craft or jewelry jargon  going around and I can't keep up sometimes.

So this is my current Work In Progress, WIP.
I am working on a mask.  Initially, I didn't know where to get one that could hold the weight of whatever I will adhere to it and it should withstand high oven temperature without melting or burning.  This was what I found at Michaels.  It's made out of paper mache or something like that.  I hope it doesn't burn.

I used Adirondak Metallic Acrylic Paint in Gold.  Oh, I love the rich texture!  I am thinking of a Princess going to a masquerade ball wearing a beautiful gown to meet Prince Charming.


Isn't it dramatic?

I decided to let it dry overnight and will start completing the design tomorrow. 

What do you think would be nice to decorate it with?  Beads, polymer clay, wire, flowers, fiber or maybe a little of each?

Come back soon and find out.
Enjoy the rest of the week!

Blessings,
♥  Michelle  ♥  

Monday, October 1, 2012

[Vintaj] "The Beaming Raven" Sept. 2012

Welcome back to Making Jewelry!
I wanted to share with you this necklace that I made for the September 2012 Vintaj Challenge:  "Radiant Raven."   Head over to the VINTAJ BLOG and  cast your vote.  I'm Number 8

This necklace is:  "The Beaming Raven."  

I started with a Vintaj circle blank and used the Deco Emboss folder    .  This was followed by the fun stuff!  I added patina and sealed it with the Vintaj sealer.  It was my first time to use the products and they were really nice - but you have to work fast because it dries up pretty quick.

The necklace is 24 inches in length and has a toggle clasp closure.  I made a tree branch to hang the focal embossed blank using 20g wire with wrapped coral beads.  I wanted the piece to be organic, so I added pearls and ceramic beads that match the color palette.  I love it!

Head over to the Vintaj blog and see what others have made.  While you're there, why don't you cast your vote (wink! wink!)

Have fun!

 Michelle  ♥

Sunday, September 30, 2012

[Clay] "Inspired By" Magnets

Welcome back!  This is my last post for September 2012 - time flies by so fast!

Do you have one of those refrigerators with a lot of magnets on its door?  Photo magnets that remind of family and loved ones or those with 'save-the-date' wedding reminders.  Some people have magnets from the places they've visited.  We have quite a few magnets on our ref now - mainly used to clip our bills or new recipes... LOL.

I made a few magnets (for the ref and/or magnetic message board) that have inspiring messages.  
It's nice to read something "positive" to brighten up our hectic day.
You are My Sunshine!

You are Precious!

Love Will Be Our Home

May you have a wonderful week!  Let us all welcome October!  
See you soon!

♥  Michelle  ♥

Sunday, September 23, 2012

Travertine Tile Coasters

Welcome back!  It was a fun and hectic weekend for Mr. C and me.  We joined neighborhood street sale for the first time!  It was nice to meet our neighbors and sell some items as well.  More on that on a future post.

I would like to share with you a DIY project:  Travertine Tile Coasters.  You can see a lot of these in blogs or pinterest and though it's quite simple to make, it looks beautiful.
Materials:  1.  Travertine Tile 4x4 inches - It is best to use travertine tile (tumbled tile) for this project versus shiny ceramic tiles.  The tiles come in 9 pieces but some of them had more and bigger 'craters' in them, which also adds character.
2.  Solvent ink pad and rubber stamp cleaner.  StazOn solvent inks work best for this project as they are nicely absorbed by the material.
3.  Rubber stamps 
4.  Cork - to be used as backing.
5.  Cyanoacrylate glue

Procedures (kindly refer to the photo collage):
1.  Figure out your design and choose a nice stamp.  I used a sentiment and a vine stamp.
2.  Apply StazOn ink liberally and carefully stamp the tile.  Avoid "rocking" the rubber stamp instead press firmly.
Allow to completely dry.
3.  While waiting for the ink to dry, cut a cork sheet a little smaller than the tile.
4.  Use cyanoacrylate glue to attach it to the base of the tile.  Allow to dry for several hours to make sure it is secure.
5.  Your tile is ready to use!
I didn't apply a sealer anymore.  Gina K of StampTV said that it is permanent and water proof.  Well, I had to prove it to myself.  I ran tap water over it and true enough. the ink stayed crisp!

Try making these.  Have fun and share your project with me.

Have a blessed week ahead!

♥  Michelle  

Tuesday, September 11, 2012

[Baking] Crema de Fruta

What's your fondest memory of your Grandparent?  
Mine was enjoying a bowl of ice cream with my Lola who was my roommate for a long time before she passed away.

We honored our grandparents in Church last Sunday that was followed by a luncheon.  While others cued for the different viands, there were several who flocked to the dessert table... including me!  I love desserts especially those with creamy fillings.

I baked a cake for the first time in our not so new apartment and found out that the oven worked pretty well.
I baked "Crema de Fruta."  It's a sponge cake filled with fruits, cream and topped with gelatin.  When I was growing up in Manila, my mom would take home crema de fruta from Goldilock's bakery.  Yup, there's such a bakery in the Philippines.  

It was my first time to make it and oh my gosh... it was so tedious!  I started baking at 1030 am and finished at 2pm!  
There were several steps: 
1.  Bake the cake which was a sponge cake,
2.  Make the cream and custard,
3.  Assemble the layers of cake,
4.  Prepare the gelatin topping,
5.  Slice the fruits and arrange on top and finally, pour the gelatin mixture on the cake and refrigerate to harden, and the most difficult of all...
6.  Wash the kitchen utensils, beater, whisk, bowls, pans, measuring cups and spoons, etc.

(not to mention washing my hands several times in between to make sure everything is clean).

Crema de Fruita
All the hard work was replaced with happiness when peeps at church stood in line just to have a piece.  It was gone in a few seconds!  They told me it was good - not too sweet but delicious!

Not too bad for my first try.  I learned a lot in the process.
Next time, I won't use kiwi because it softens quickly and is "too wet."

Have you ever baked crema de fruta before?  How did it go?

♥  Michelle  ♥

Sunday, September 9, 2012

[HPCG Aug 2012] Faux Dichroic Pendants

Welcome back!

We recently had a demo at the guild (Houston Polymer Clay Guild) on faux dichroic effects by one the members, Laura.  I tried using Lisa Pavelka's foils and UV resin before but never got hooked on it.


The demo was very informative and interesting.  It opened ideas on how to make better use of the products.


These were the projects that I made a few days after the demo.  I still have to apply resin though it looks pretty good without it.  Oh, I just hope my resin application would be perfect and bubble free.
Stay tuned for that.


Happy crafting!

♥  Michelle  ♥

Wednesday, September 5, 2012

[Food] Screaming for Ice Cream

I scream for ice cream all the time.  It's a staple in our home growing up and everyone in the family loved it!  Sundays are extra special when we drive by the store to buy half a gallon of this deliciousness!
Now that I'm older and with slowwwwwwer metabolism, I have to watch what I eat.

Take a look at this:  Blue Bell Moolenium Crunch topped with a fresh Cherry.


My Dear Husband (DH) and I are trying to do portion control, as advised by my trainer.  Of course, we can't let go of our dairy (though I know it's not too good for our body) so we decided to go another way.

This is our version of portion control... LOL!

A taster's cup and spoon with barely a scoop of ice cream.  
I guess it worked because it took several teaspoons to finish one serving and somehow, it satisfied my craving.

How do you portion your food?

Saturday, September 1, 2012

Christmas is (almost) Here!


WELCOME SEPTEMBER!

I can't hardly stand the wait... please Christmas don't be late.


But then again... I'm not really ready for it yet.

Have a good weekend, friends!

♥  Michelle  ♥


Tuesday, August 28, 2012

[Cooking] RECIPE: ToBingCab's Spinach Stuffed Mushrooms

Welcome back to The Cabby Crafter!

I was surprised when I asked my husband what he wanted for dinner and he replied:  
"Is it alright just to have salad?"  
Oh my.. I had to touch him and make sure he wasn't sick or in a state of delirium.

We have been eating healthier these days since we were finally on our own, in our cozy hideaway.
 It feels nice not to eat too much meat and rice (which is a staple for us Filipinos).  

I scoured our ref for stuff to use and came up with this:
"ToBingCab's SPINACH STUFFED MUSHROOMS"
Ingredients:
          Fresh Whole mushrooms (7 was enough for both of us)
          3 cloves of Garlic
          1/4 segment of white onions
          Fresh Spinach leaves
          Sargento Shredded Monterey Jack, Queso Quesadilla and Asadero cheese 
          Bragg's Liquid Aminos Seasoning
          Salt and Pepper to taste

Procedure:
1.  Clean the mushrooms with a damp paper towel.  If washing gives you a sense of being extra clean, do it quickly as mushrooms absorb water.  Cut off the stems and set aside.
2.  Chop the garlic, onion and the mushroom stems.  Saute in a little extra virgin olive oil.
3.  Add the spinach leaves and season with Bragg's liquid aminos, salt and pepper.  Don't overcook the spinach so as not to lose it's superpowers.
4.  Scoop a small amount of the sauteed spinach mixture onto the mushrooms.  Top with shredded cheese.  Arrange mushrooms in a pan and bake at  350C for 15 minutes.
5.  Serve while hot but be mindful of the steamy hot cheese.  Enjoy!  


My friend Sandi mentioned in her blog that eating "meat free" can be fun and delicious too.  
It's not just all cold leaves and dressing.

Try this recipe, make your own variation and share it with me.  
Mr. Cabby Crafter told me it was "NAMIT!" (delicious).

Happy cooking!
 Michelle  

Saturday, August 25, 2012

[Bead Soup] 6th Bead Soup Blog Party 3rd Reveal

Welcome to The Cabby Crafter!  I am so glad you stopped by.
Today is the big reveal of Ms. Lori Anderson's 6th Bead Soup Blog Party - the 3rd and last for this year.Whew!  Have you seen the beautiful creations that the participants made?

This was my 2nd BSBP and I was paired with Ms. Sonya Stille.  Read more about her HERE.  The assortment of beads and findings that she sent me was delicious!  I love the everything particularly the copper leaf that she made.  I hardly word with copper, in fact, this was the most copper that I've worked with.

The BSBP guru, aka, Ms. Lori asked us to give a focal bead and a clasp.  The copper leaf that Sonya did was gorgeous and I wanted it to be the centerpiece of this necklace!  I used copper wire, hammered the end, added green beads and wrapped it with wire...lots of wire to make a bail! 
This was an asymmetrical necklace that drapes very nicely on the neck.

I love the color palette - browns and greens, very earthy, "organic" as they call it.
This lariat necklace made use of the nuggets, crystals, copper chain and enameled round beads.  
More wire wrapping but fun!
This was the pot of soup that Sonya sent me.  Isn't it lovely?   Visit Sonya's BLOG and see what she did to the bead soup that I sent her.  Check out her Pinterest and FB page too.


Here's the List of the 3rd BSBP Reveal.  Grab your comfy seat and hop on!
Hostess, Lori Anderson, Pretty Things

Agi Kiss, Moonsafari Beads 
Alice Peterson, Alice Dreaming
Alison Sachs, Beads by Earthtones
Amanda Dittloff, Passion Smashin'
Andra Marasteanu, Bijoux de Monanage
Angie Szlovak, SweetBeads
Anitra Gordy, Leelu Creations
Ann Sherwood, Ann's Blog
Arlene Dean, A Glass Bash
 
Audrey Belanger, Dreams of an Absolution
Barb Solem, Vivi Magoo Presents
Barbara Blaszczyk, laboratorim Flory
Bianca Odenthal, Zydies Glasperlen
Birgit Klughardt, GitesBeads
Bobbie Rafferty, Beadsong Jewelry
Bonnie Coursolle,  Jasper Gems
Cece Cormier, The Beading Yogini
Charlene Jacka, Clay Space
Cherrie Fick, En La Lumie're
Cheryl Foiles, Get Your Bead On
Christie Murrow, Charis Designs Jewelry

Christina Miles, Wings n Scales
Christina Stofmeel, Feng Beads
Christine Stonefield, Sweet Girl Design
Cindy Cima Edwards, Live to Design
CJ Bauschka, 4 His Glory Creations
Claire Smith, Embergrass Jewelry
Cynthia Riggs, Cynth's Blog
Dana Fowler, Trunk Full of Treasure
Dawn Pierro, Turtle Moon Designs
Dee Elgie, Cherry Obsidia
Donetta Farrington, Simply Gorgeous
Dot Lewallwn, Speedie Beadie

Eileen Snyder, Dorset Hill Beads
Elizabeth Bunn, Elizabeth Beads
Eva Kovacs, Ewa gyongyos vilaga!
Evelyn Duberry, Sheba Makeda
Fay Wolfenden, Torch Fairy
Fen Li, Bead Flora Jewels
Gail Zwang, Angel Moose Enterprises
Geneva Collins, Torque Story
Grace Dorsey, Fan of the Flame
Gretchen Nation,  Art Food Lodging
Hannah Annear, Squintessential

Hajer Waheed, My Beaded World
Heather Goldsmith, As I Bead It
Heather Otto, The Craft Hopper
Heidi Kingman, My Bead Therapy
Hope Smitherman, Crafty Hope
Isolina Perez, Isolina Perez
Jacqueline Keller, CreARTelier
Jane Haag, Did You Make Something Today?
Janeen Sorensen, Wild Vanilla Designs
Jean Peter, Jean P. Designs
Jennifer Judd, Jen Judd Rocks
Jennifer L Justman, Soul's Fire Designs
Joanna Matuszczyk, Bizuteria z filcu
Joanne Brown, Jo's Jewels

Joanne Lockwood, Jo Bunkum
Joyce Becker, Joyce's Joyful Gems
Judy Riley, Three Red Beads
Karen Mitchell, Over the Moon Design
Karen Williams, Baublicious
Karin von Hoeren, Creative Ideen
Karla Morgan, Texas Pepper Jams
Kashmira Patel, Sadafule .. always in bloom!
Kate Richbourg, We Can Make That at Home
Katrin Lembke, AllesPerle
Kathy Combs, Torched in Texas

Kathy Lindemer, Bay Moon Design
Kay Thomerson, Kayz Kreationz
Kelley Fogle, My Life, One Bead at at Time
Kelly Hosford Patterson, Traveling Side Show
Klaudette Koon, Only Road
Lara Lutrick, Lampwork Beads by Lara
Laura Guenther, Blue Antiquities
Laurie Lalonde, Simply Mod Jewelry
Lilik Kristiani, Soul of My Embodiment
Linda Younkman, Lindy's Designs
Lisa Chapman, Beach Cat Beads
Lisa Lodge, Pine Ridge Treasures

Loretta Carstensen, Designs by Loretta
Lori Bergmann, Lori Bergmann Design
Lori Dorrington, Lori's Adventures in Etsy Land
Lupe Meter, Gem's PC Corner
Lynn Davis, LLYYNN
Malin de Koning, Beading by Malin
Mandi Effron, Craft-o-licious
Mandy Williamson, Mimi's Beading
Margot Potter, The Impatient Crafter
Maria Rosa Sharrow, Willow Street Shops

Marianne Baxter, Simply Seablime Jewelry
Marina Dobrynina, Savon Feutre
Marjolein Trewavas, Room for Change
Marelene Cupo, Amazing Designs
Marsha Neal, Marsha Neal Studio
Marta Kaczerowska, uhuhu
Mary Govaars, MLH Jewelry Designs
Melissa Trudinger, Bead Recipes
Menka Gupta, Menka's Jewelry Blog
Michelle Burnett, Reverie and Revival
Michelle Escano-Caballero, The Cabby Crafter - THIS IS ME!
Miko Wiropati, Uniquely Yunikua
Milla Hope,  LB Creative Arts and Crafts

Mimi Gardner, Other Curiosities
Miranda Ackerley, MirandackArts
Natalie McKenna, grubbi
Noemi Baena, fuego, metal, y color
Pam Ferrari, Ferrari Originals
Pam Sears, Crazy Creative Corner
Penny Neville, Copper Penny
Rachel Baron, R. Baron Designs
Rachel Myers, Rockabead Jewelry
Rana Wilson, Definitive Designs by R. Wilson
Rebecca Anderson, Song Beads
Rebecca Sirevaag, Becca's Place
Riki Schumacher, Riki Jewelry
Rose Binoya, Ahtee's Blog

Rossana De Gaspari, Rdegas Blog
Sandi James, Do Be Do Bead Do
Sandi Volpe, Sandi Volpe
Sandra Wollberg, City of Brass Stories
Sarah Goode, Pookledo
Sarah Small, blog by salla
Shai Williams, Shaiha's Ramblings
Shawn Mills, Shawn Marie Designs with Bent Wire
Sheila Davis, Stone Designs by Sheila
Sheryl Stephens, Babble Bead
Shiraz Biggie, Secret Song Designs
Solange Collin,  Ahowin Handcrafted Jewelry
Sonya Stille, Dreamin' of Beads - MY AWESOME PARTNER!!!
Stephanie Dixon, The Dixon Chick

Susan Kennedy, Sue Beads
Susan Sheehan, Strands of Thought
Suzann Sladcik Wilson, Beadphoria
Sweet Freedom, Sweet Freedom Designs
Tabatha Dinger, Modernly Created
Tania Hagen, Pelima Jewellery Design
Tanya Boden, Fusion Muse
Terri Gauthier, Blooming Ideas
Terry Carter, Tapping Flamingo
Tracy Stillman, Tracy Stillman Designs

Enjoy the weekend!  
Happy hopping!

♥  Michelle 

Monday, July 30, 2012

[Deco Clay] "A Peony for Your Thoughts"

Welcome back!

Tell me what you think:  Does this look like a peony or a wilted rose?


Oh well... this was my first attempt in making one with the help of YukikoMiyai's instructions.
Obviously, I need more practice and lots of clay.

What's keeping you busy?

♥  Michelle  ♥