Showing posts with label Hero arts products. Show all posts

Tuesday, August 6, 2013

[Packaging Ideas] Cookies in Burlap

Welcome back!  A few weeks ago, I shared with you about baking Pinipig Cookies.

Well, my husband and I sent some of it to Chicago as a birthday present to our cousin.
We placed the cookies in a plastic container and then wrapped it in burlap and tied an orange ribbon.  The cookies fit well in the container but my guess is that it crumbled during shipping.

What do you think about her birthday card?  
I stamped the image using Hero Arts Clings CG315 and added Colorbox pigment inks and embossed it with Judikins clear detail embossing powder.  I like how it turned out... the colors, dimension, gloss and all.
The sentiment is from the Hero Arts CL488 clear stamp set.

I'm into "orange" recently as seen in my projects.  
Remember the orange tulips in my mosaic challenge?

"Orange you glad we're halfway through the week?"
I am.

See you soon!
♥  michelle  ♥

Friday, July 12, 2013

[Focus on Life] Week 28: Pretty Patterns

It's the weekend again, time for Ms. Sally Russick's Focus on Life.  
It's Week 28 and its all about Pretty Patterns.

Let me share with you the card that I made for a friends special birthday.  My friend has a nice garden with different kinds of roses, hibiscus, and fruit bearing trees that her mom planted when she visited from the Philippines a few years ago.  It's her birthday and I wanted to make her a card full of flowers.

What do you think of this card?  Isn't it pretty?  I used a from Hero Arts rubber stamp H5481 Classic Bloom that I bought during last week's trip to the craft store.  I stamped the image using Versafine in Onyx Black several times on a piece of yellow cardstock to make a pretty pattern of happy flowers.  

Hero Arts H5481 Classic Bloom Rubber Stamp
I colored the petals with a combination of yellow and orange colored pencils and the center with shades of brown.  The sentiment is from TPC Studio's "Everday Greetings Stamp" that I heat embossed using Versamark and Judikins black opaque embossing powder.  

Finally, I added Mod Podge Dimensional magic on 2 of the flowers to add a little interest.  I love the gloss!

Did you notice the chevron pattern on the background of the photo?  
Can you guess what that is?
It's the car seat cover.  We were running late for our birthday surprise so I took a last minute shot of it.  Pretty pattern, right?

Thanks for stopping by to see my pretty patterns.  Let's head over to The Studio Sublime and check out other pretty patterns.
Have a wonderful weekend ya'll!  
See you soon!
♥  michelle  

Friday, July 20, 2012

[Gift] For Shon

A dear friend of mine is having a grand celebration this weekend: 
 her and her husband's birthday and their wedding anniversary - such a lovely couple.
May God bless you as you continue to enjoy your journey together.

I gave her a leather bracelet with a focal piece that I modified by adding color using PC.
The handmade card was made using Cuttlebug embossing folders, Hero Arts cupcake stamps and 
Stampendous Birthday sentiment.

Have fun!
♥  Michelle  ♥

Monday, October 31, 2011

Tanjoubi Omedetou [Happy Birthday in Japanese]

Have you seen this clear stamp set from HeroArts?  It's so cute!

One of our famly members is celebrating her birthday so I decided to use the stamps for her card.

I stamped the Japanese girl on white cardstock and the robe on a green patterned origami paper using Versafine ink.  I added a green bling-bling on her hair.
The paper lamp was stamped in white cardstock and colored using Tombo ABT markers.  I added embroidery floss for on the top and bottom of the lamp.
The sentiment is from HeroArts too.

I layered these elements on a designer paper and then on an off-white cardstock that was distressed with Ranger's bundled sage.

Have a great week of crafting!

Enjoy!

Thursday, January 20, 2011

MyHub's Vday card [HA January 2011B]

It's Thursday Card Day here at Cabby Crafter's corner ☺. 
I had fun shopping today with my sis--law.  We went to a local craft store where I was able to buy my new HA Clear Stamp.  Yay!  As soon as I got home, I made a card for my hubby.  We recently celebrated our 2nd year wedding anniversary and this is an advanced V-day card - the card says it all about us... "You had me at 'Hello.'"
Likewise, it is an entry for HA ongoing contest for January 2011:  Inspired by the 2011 Catalog & Card Insides.  Technique:  Masking.  Why don't you check it out HERE join the fun!
Stamps:  HA CL483 TYPE, HA Alphabet set
Base card:  Cream cardstock
Mat:  chocolate brown, white, and DCWV pp, yellow pp
Inks:  Memento Rich cocoa, Versafine Onyx black, Colorbox pigment ink Scarlet, Ranger's Distress Ink Walnut Stain, Antique Linen
Adhesives:  Tombow mono adhesive, Dimensionals
Here is what I made:
HA V-Day Card

Ha V-Day Card Inside

Thursday, January 13, 2011

Birthday cupcake [HA January 2011A]

Yay! I was able to make a card for Hero Arts in time for todays deadline. Whew! This months theme is: Inspired by the 2011 Catalog and Card Insides.
The new catalog is full of beautiful designs, from background stamps, floral themes, sentiments, quirky themes, etc - check it out HERE
Here are the HA stamps that I used:  CL158 sprinkles and LP133 Ink n' stamp: Sweets
Materials:
Paper:  brown card base; yellow designer paper, metallic brown paper
Ink:  Versamark, Ranger's bundled sage distress ink, Memento Rich cocoa
Embossing powder:  Judikins black
Color:  Derwent watercolor pencils
Punch:  Martha Stewart bubble punch
Glossy accents (applied to the 'cake' of the cupcake)
Adhesive:  Tombow monoadhesive, dimensional adhesive
HA January 2011A

Saturday, January 8, 2011

A couple's birthday [LGE ♥ MVSE birthday cards]

Hello friends!  I would like to share with you 2 cards that I made for my brother and his wife's birthday.  These are rather simple cards but definitely handmade with love ♥.

It's always challenging to make a card for a boy or a man in this case.  Here, I used a dark blue card base and added a PP of buttons.  To add texture and dimension, I embossed a diamond pattern for matting and stamped Hero Arts sentiment and placed it on the center.  Finally, I added blue brads on the four corners using my new Making Memories instant setter (a Christmas gift from my uber loving SIL); blue embroidery floss was wrapped around the brads to add interest. 

LGE

This next card was made for my brothers wife.  Oh, she loves and looks really good wearing the color yellow so I made her a card in yellow tones and coordinates.  I used a yellow cardbase and a printed PP.  I added a brown mat which i background stamped using Versamark and DeNami stamp.  I added a scallop border punch from Martha Stewart.  Then, I stamped the sentiment using Memento in Rich cocoa against a sage green distressed background.  The final step was an engraved rust colored button with yellow embroidery floss - just to add a little interest.

MVSE
Happy birthday to two most wonderful, special and loved people!  Cheers!

Friday, December 17, 2010

Giving Thanks and Color Challenge [HA December 2010 Challenge]

It's mid-December already... wow, where did the time go? 
I was able to finish 2 cards for the hero arts December 2010 Challenge

The first card that I made was for the color challenge.  I used my HA clear sending holiday cheer stamp set and slate blue cardstock.  I made the background using the pine trees and added snowflakes that i embossed with white.  I also added glitter on the skyline.  I stamped the house, colored and cut it out.  Finally, i added the sentiment,a scallop border dp and 2 red crystal brads.

The second card that I made was a thank you card.  It's a simple card made with love.  I used F5030 Long stem blossom, stamped embossed with gold.  I matted this on a blue cobblestone embossed dark blue paper.  The hand printed the sentiment and added a ribbon.  I placed a gold flower brad on each corner of the mat.  I love the effect of the stamped brass blossom and the brass brads, though it was a challenge to take a good photo.  Simple but made wth love.  TFL ☺♥☺.

Saturday, November 27, 2010

Handmade gifts and tags [Hero Arts Nov. 2010]

Today is Friday and it's the last day of submission for HA's November challenge.  It should've ended yesterday but they moved it due to the thanksgiving parteees.  Another day to zap my little creativity.  I have been busy doing crocheted gifts for lovedones.  I have finished 2 hats this weekend.  One is for a cute baby girl and the other is for my very loving aunt. 

This pink/brown hat is for my goddaughter who recently turned 9 months.  I love looking at her photos with her big ribbon and nice hats and outfits.  So, i made her a hat and a card.  The size of the card is 4.25" x 5.5".
I used stamps from CL155 Playful animals, colored, mod podged and cut them.  I added red hats... because it is Christmas!  Then, distressed the background pp and stamped snowflakes and sentiment (from CL464 Sending holiday cheer).  I matted it on a holly paper background, added embroidery floss, a red ribbon and finally placed it on a red base.  Isn't that cute?  I just hope the hat will fit her.

The second hat is for my aunt who loves the color purple.  It was a challenging hat to make - something out of the ordinary from what i have done in the past.  I am so excited to mail it to her so i had to make this tag, asap (lol)!

For the ornament, I did block stamping on a white paper and stamp embossed the ornament - I used F5276 Flourish ornament rubber stamp.  I cut it out and placed a yellow ribbon and a green bead.   I used a background paper which i distressed with walnut stain distress ink after which,  I stamped the vine stamp.   The ornament was attached using dimensional adhesive and added a twine on top.  The sentiment was from the ending holiday cheer clear stamp set.  Finally, I punched the bottom edge with MS bubble punch.

Christmas is coming very soon and I still have a lot of crafting, crocheting and everything in between to do.  Have fun!


Saturday, November 20, 2010

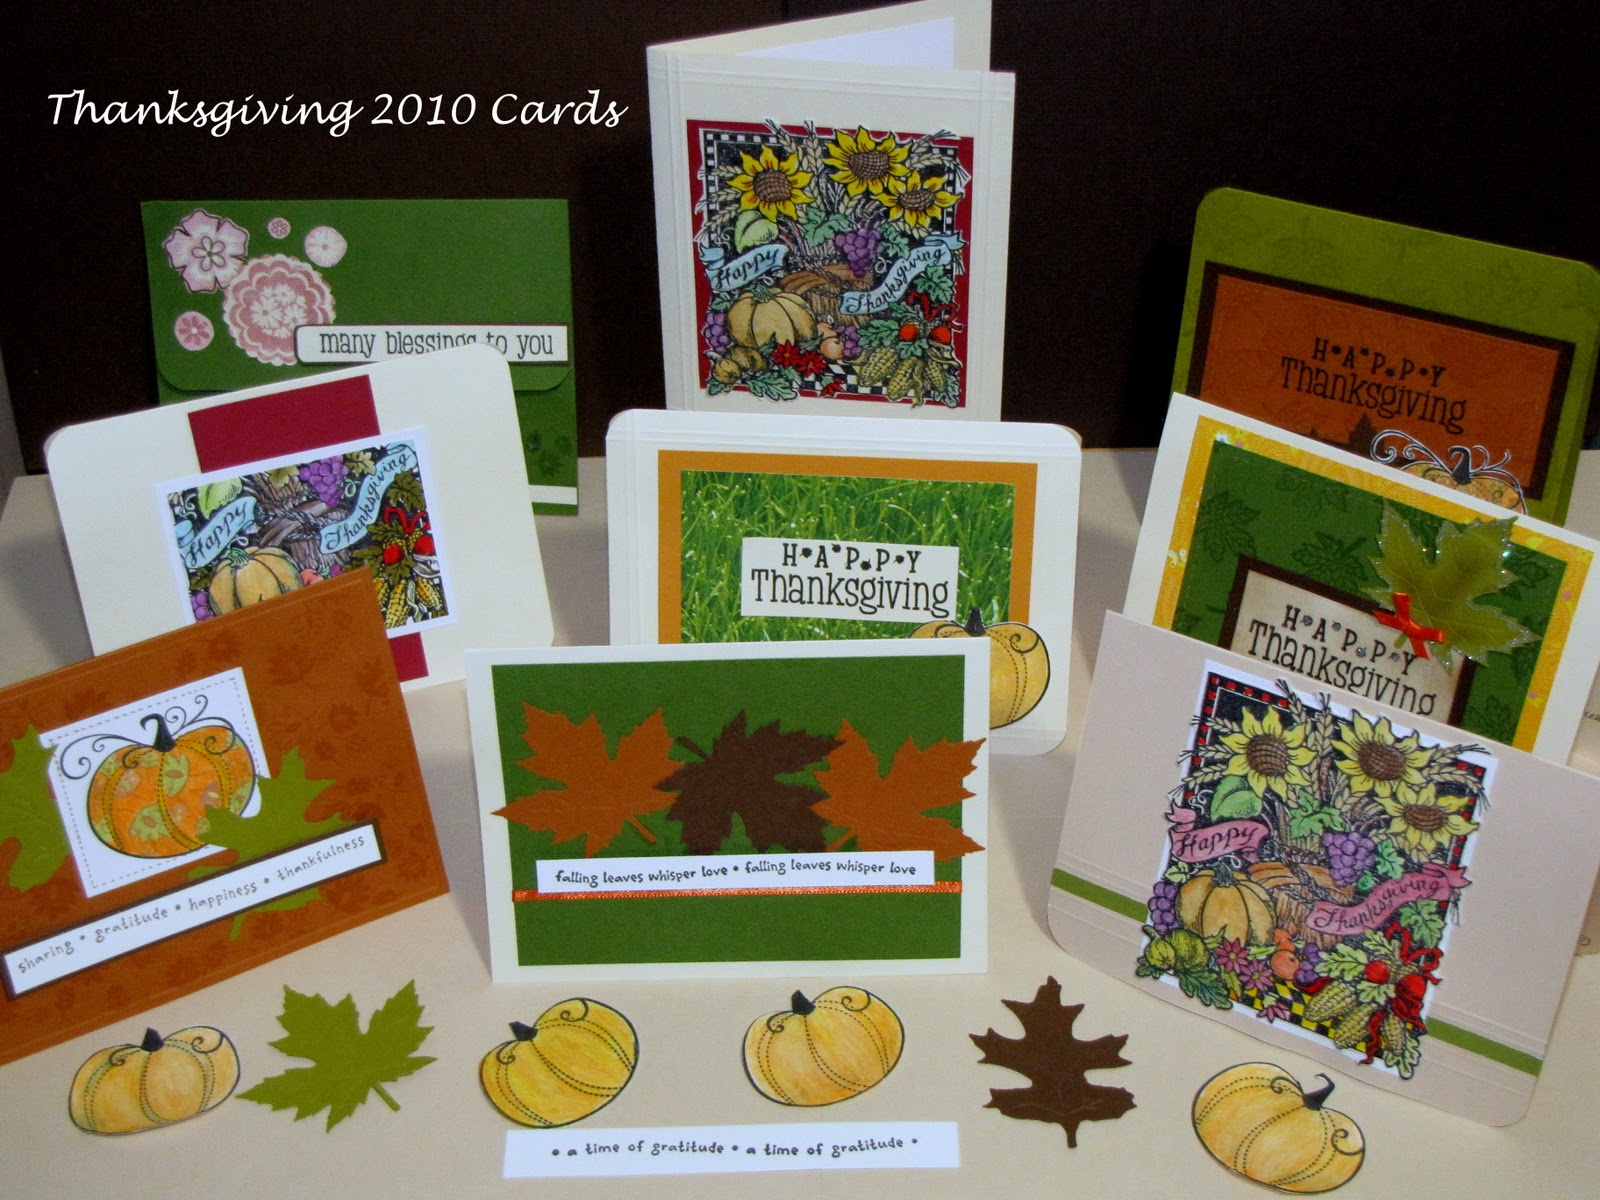
Thanksgiving 2010 [Handmade Cards]

We don't have an official "Thanskgiving Day" in Manila so this would be my first one in the US.  I have always wondered why Americans, in particular, look forward to celebrating it.  What is it all about? 

I found a very interesting Thanksgiving website that you might want to check out.  Here are some portions of their article.

'"Thanksgiving is America's preeminent day. It is celebrated every year on the fourth Thursday in the month of November. It has a very interesting history. Its origin can be traced back to the 16th century when the first thanksgiving dinner is said to have taken place.

Journey of the Pilgrims
The legendary pilgrims, crossed the Atlantic in the year 1620 in Mayflower-A 17th Century sailing vessel. About 102 people traveled for nearly two months with extreme difficulty. This was so because they were kept in the cargo space of the sailing vessel. No one was allowed to go on the deck due to terrible storms. The pilgrims comforted themselves by singing Psalms- a sacred song.

Arrival in Plymouth
The pilgrims reached Plymouth rock on December 11th 1620, after a sea journey of 66 days. Though the original destination was somewhere in the northern part of Virginia, they could not reach the place owing to winds blowing them off course. Nearly46 pilgrims died due to extreme cold in winter. However, in the spring of 1621, Squanto, a native Indian taught the pilgrims to survive by growing food.

Day of Fasting and Prayer
In the summer of 1621, owing to severe drought, pilgrims called for a day of fasting and prayer to please God and ask for a bountiful harvest in the coming season. God answered their prayers and it rained at the end of the day. It saved the corn crops.

First Thanksgiving Feast
It is said that Pilgrims learnt to grow corn, beans and pumpkins from the Indians, which helped all of them survive . In the autumn of 1621, they held a grand celebration where 90 people were invited including Indians. The grand feast was organized to thank god for his favors. This communal dinner is popularly known as “The first thanksgiving feast”. There is however, no evidence to prove if the dinner actually took place.

While some historians believe pilgrims were quite religious so, their thanksgiving would've included a day of fasting and praying, others say that the Thanksgiving dinner did take place.

Turkey and First Thanksgiving Feast
There is no evidence to prove if the customary turkey was a part of the initial feast. According to the first hand account written by the leader of the colony, the food included, ducks, geese, venison, fish, berries etc.

Pumpkin and Thanksgiving Feast
Pumpkin pie, a modern staple adorning every dinner table, is unlikely to have been a part of the first thanksgiving feast. Pilgrims however, did have boiled pumpkin. Diminishing supply of flour led to the absence of any kind of bread.

The feast continued for three days and was eaten outside due to lack of space. It was not repeated till 1623, which again witnessed a severe drought. Governor Bradford proclaimed another day of thanksgiving in the year 1676. October of 1777 witnessed a time when all the 13 colonies joined in a communal celebration. It also marked the victory over the British.

After a number of events and changes, President Lincoln proclaimed last Thursday in November of thanksgiving in the year 1863. This was due to the continuous efforts of Sarah Josepha Hale, a magazine editor. She wrote a number of articles for the cause."


Each one of us have our own reasons to give thanks for:  family and friends good health, provision, work, blessings, etc.  Everyday is a day to thank God for all His blessings and this special holiday makes it even better.  I made and mailed my first thanksgiving day cards today.  I had fun creating these cards. 
I used HeroArts rubber stamps (F3585, F3586, F3587, F3590), HA clear pumpkin stamp, falling leaves and sentiment.  My SIL had a nice rubber stamp block with sunflowers and a table spread of fruits - i colored them with Derwent watercolor pencils and burnished it to give texture and definition. 
I love all of them and hope that it brings the reader a warm smile as well.  The inside of the card reads: 
"For the Lord is good; His lovingkindness is everlasting, and His faithfulness to all generations." - Psalm 100:5
HAPPY THANKSGIVING!   


Saturday, November 6, 2010

HA Quickcard4


Quickcard4
Originally uploaded by cabbycraft
Today is a nice, cool, sunny and lazy Saturday. I browsed through flickr and what do you know? HA's Barb has a 90 minute scrambler challenge. It was my first time to join so with barely 35 minutes left, i grabbed my stuff. Her challenge was to make a Christmas card using flowers (emphasis on NO POINSETIAS ☺). So i grabbed my favorite flower stamp, friend definition background and punched pot. I love it! Then, i stamped the sentiment on gold paper and tada! My quickcard is done!
Next challenge for me was how to post it on the HA group and then to to the discussion board. All this computer and blogging hi tech terminologies are quite challenging to me so it took awhile before i could finally upload it on the discussion board. Geeez... i hope i made it on time.
That was fun. I never thought that being under time pressure could make my creative juices flow so fast. Hahaha... if it was like that everyday, i'd have tons of cards to upload.
Have a great weekend, my friend!

Friday, November 5, 2010

Christmas in November

Can you believe it?  It's November 5 already and i haven't made a card yet.  Hahaha.  Trust me, for a craft enthusiast, that's a dilemma.  It gets so overwhelming looking at the blogs and all the tutorials going on - it's like being in a class with so many homework to do. 
Anyway...  I made a Christmas card today.  I used HA Cl464 Sending holiday cheer set.  I love the set but somehow, i find the sentiments too large to fit regular card size (4 1/4 x 5 1/5") or perhaprs, i'm not too creative to figure the best way to use it. 
Since i will be spending my first white Christmas, i made a winter landscape.  I stamped and embossed pine trees for the background.  I stamped a house, colored and tried adding mod podge matte to it.  It was my first attempt to use mod podge and i like it.  I added designer paper on on the bottom.  I added shades of green to offset the "blue winter" scene.
Thanks for looking.  Blessings!

Materials:
HA CL464 Sending holiday cheer
Clearbox white ink; Judikins opaque white embossing powder
Versamark; Judikins Black embossing powder
Marvy markers
Cardstock:  cream, blue, white

Check out:  my Flickr

Thursday, October 28, 2010

Getting ready for Christmas

Christmas is in the air!  You can hear the good ol' Christmas songs being played in the radio.  It's the season that I love the most.    It's a time to celebrate the birthday of my Saviour and King, Jesus Christ.  It's a time of rejoicing with family and friends, giving gifts and exchanging cards.
I have my first Christmas gift all boxed up today...yay!  I combined my love for crochet and crafts and came up with a nice gift for a very special person.  This is also my first time to make a box using MS tools... awesome!  For this project, i used the block stamping technique (thanks, Jennifer McGuire and HA tutorials) and a lot of embossing (thanks Nancy Taylor and Nicky Hsu).  You can hop on to the  HA blog and check out their great tutorials and creative cards.
Thanks for dropping by.  May you have fun being creative as well!  Blessings!

 I made a square box measuring 7"x7" and decorated with with stamped images and added a border and ribbons.
Materials: 
HA F526 Flourish ornament rubber stamp
CL 464 Sending holiday cheer
Versamark ink, Ranger distress ink Walnut stain
Embossing powder Medieval metals and Black
Cardstock:  red, green, brown, white metallic
Floss:  red and green
Martha Stewart punch around the page:  Bubble bath
Martha Stewart scoring board
markers, foam tape, tape adhesive

Wednesday, October 27, 2010

Christmas in October

2 days ago, my husband lovingly drove me to my favorite craftstore were i found a nice HA Flourish ornament rubber stamp.  I deviated from the usual red and green christmas motif and used yellow and green shades.  I made a background stamp using the block stamping method that i learned from Jennifer McGuire HA/2 Peas Thinking Inking.
I stamped it on a DP and embossed the image using black embossing powder.  I added extra fine glitter and a ribbon.  I stamped the sentiment inside the card.
I had fun making this!

Sunday, October 3, 2010

HA World Cardmaking Day, 10-3-10

I never thought that there was such a thing as World Cardmaking Day.  I found out through the Hero Arts blog and of course, i wanted to participate.  So, with only a few hours left, i grabbed some stamps and made a card.
I have been busy crocheting hats and jewelry for the past weeks so my stamps and stuffs have been on the shelf for quite some time. 
I thought it would be nice to incorporate sewing in my theme - hence, the "You're sew Special" card, embellised with buttons that i find really cute!
Thanks for taking a peek.   Have a great week!


Materials: 
HA C1157 3 spools
HA C1158 Button cluster
Red and cream cardstock
Cream and lime green ribbon
Memento ink in rich cocoa
Versafine ink in Onyx black
round puncher
Marvy markers
Derwent watercolor pencils

Thursday, September 23, 2010

Happy Thanksgiving 2010!

It's been exactly a month since my last blog.  Haha... the lazy bug caught me for quite some time.  Things have been fine with me - i decided to try other crafty things like crochet (more on that at a later blog). 
I checked out HA's blog last week and made a couple of not-so-nice thanksgiving cards.  I had a "mental card block" once again and it took some time to get those creative juices out.  Anyway... i'd like to share them.

My MIL and i went to my awesome SIL's house to do some stamping.  I used her "Thanksgiving stamps" and leaf embossed punches.  I loved punching out the maple leaves - i distressed some using Ranger's walnut stain then added glitter on the edges.
In one card, i masked/stamped the pumpkin with a stamp from the same HA clear stamp set.  It was fun to mask but it was quite tedious.  As you can see, the colors are not as pretty as it should be - hmmm...i think i should buy, stock up and try using those wonderful copic markers next time.
This is all for now, friends.  Thanks for looking!


Monday, August 23, 2010

Thinking of You...sending you warm hugs ang kisses

Hello friends! 
It's Monday once again.  I woke up at 430am as hubby prepared to leave for work.  I couldn't get back to sleep so i decided to make something creative ☺♥☺.
I made this card using HeroArts F5030 Long stem blossom woodblock stamp.  I masked and stamped the image on a metallic dark blue cardstock and embossed with Ranger's gold embossing powder.  I added a punched out vase.  I used HA "Thinking of you" and "sending you warm hugs and kisses" sentiments.  I stamped these sentiments on a white paper that i distressed using Ranger's walnut stain distress ink.  I added brass flower brads for accent.
I matted the stamped images on a white cardstock and finally placed it on a blue cardstock.
I love how the card turned out.  It's simple, neat, formal but definitely filled with warmth.


Tuesday, August 17, 2010

Friends truly care

Hello friends! 
Here is another card that i made using the HeroArts Friends background.  I like this stamp very much.  The details/words are so fine and crisp.  I was inspired by Jennifer McGuire's HA embossed card background and here's my take on that.
I stamped HA butterflies from the Thinking of you collection, cut them out, applied Ranger's glossy accents and added them to the card.  The sentiment is also from HA.
I hope you like it.  It's so cheery!
Thanks for looking.  Blessings!


Monday, August 16, 2010

Friends who truly care


The August 2010 theme of the Hero Arts blog was to create anything about:  "Back to school, keeping in touch or a stationary set".
I love this theme.  Mainly because i love sending cards or letters and just keeping in touch with my family, loved ones and  friends.  Last Aug. 13, i bought a couple of stamps from a new store, Craft Fancy.  I bought a HA "Friends background" stamp (G2991).  I was so excited to use it and also try to add distress ink on it.  As i always do, i added a quilled flower.  I placed the Friend stamp off center to give a little bit of dimension.  I added sentiments from HA clear stamps:  "Thinking of you" and "i hope you know..."

I am feeling quite lonely today.  I miss my family and friends in Manila.  I miss my life, being able to drive myself around town with my mom and dad, chatting with friends and people from the hospital where i work at; i miss my colleagues, my fellow doctors and clinic office buddies, Philippine food, etc.  My life in America for now is more than laid back - a little housework here and there and that's it.  I miss interacting with people besides my family.  Crafting and making cards make me happy here - though it is really costing me, my husband actually, quite a lot of money.  Heck...  it keeps me sane  ☺.

Take care, my friend and know that i truly care for you.
Thanks for reading.  Blessings!

Friday, August 6, 2010

July 2010 cards for Hero Arts

Hero Arts July 2010's theme was food and travel, plus bookmaking techniques. It was quite challenging for me because i thought i had a "craft brain block". You know... there are days when i get dehydrated of my creative juices. Does it happen to you too? I stare at my cardstocks, paper, stamps, ink, paper trimmers, scoring pad, ruler and scissors and i just go
B-L-A-N-K. It must probably an episode of absence seizure were one just stops and stares unconsciously into nothing.
After hours that turned to days of thinking, these are what i came up with. Not exatly the best work. I used Muffin polyclear stamps and Sweet wood stamps that i bought from a craftstore in Galena. I added paper quilling in one of the cards - i loved how it turned out.


Thanks for looking, friends. Blessings!