Saturday, December 31, 2011

Welcome 2012!


Year 2011 was a year of learning new things for The Cabby Crafter.
It was a great to have attended jewelry and polymer clay workshops in Manila and in the USA.
I am looking forward to another year filled with more things and techniques to learn, more people to meet and be inspired with.

Have a safe, healthy, peaceful and blessed Year 2012.

Keep on crafting!

Thursday, December 29, 2011

Hero Arts Christmas 2011

Hello friends!
HeroArts' December 2011 Contest Theme is:
I stamped the ornament and embossed it with gold.  I added color in jewel, rich tones.
The snowflakes were stamped and embossed with white.
The sentiment was stamped in 3 colors and embossed with clear embossing powder.
These were layered on a blue dry embossed background with polka dots (poor photo quality).

A blue wire was added to finish the card.

Hope you had a Happy Christmas.
Here's wishing you a Blessed and Crafty Year 2012!

Materials:
HA 5276 Flourish Ornament Rubber Stamp
HA CL464 Sending Holiday Cheer
Ranger Gold Embossing Powder
Ranger distress Inks:  Antique Linen, Vintage Photo
Tobow ABT Markers
Judikins Clear Detail Embossing Powder
Darice Blue Jewelry Wire

Sunday, December 25, 2011

Bottlecapped Words [2011 Christmas Gifts]

What handmade gifts did you make this year?
I made these keychain, made with braided leather and bottlecapped words from polymer clay.
I incorporated several techniques in making these.  It was my first time to do it and I had a lot of fun.
I tried a different kind of glaze and was glad with how it turned out (the photo doesn't give justice though).
I like the enamel look of the piece.

The back part had a printed note that was sealed.
The red rosebuds where inspired by the work of a talented artist, RockyBeads.

MERRY CHRISTMAS, FRIENDS!
Blessings to you and your family!

Friday, December 16, 2011

Kid's birthday card

This card is for a cute girl who will be celebrating her 1st Birthday and Child Dedication tomorrow.
It is Filipino custom to have godparents who are given the privilege to stand as second parents - my husband and I were one of those chosen for this little girl.  It's a huge challenge over and beyond giving gifts during their godchild's birthday, Christmas or on special occasions and we are praying that we could stand up to the task set before us.

I used several cardmaking techniques in this card.  A designer paper was layered on a red mat.  Hero Arts stamps were used for the flowers and sentiments on the cover and inside of the card.  The cute green beetle is from K&company.  Finally, I added a quilled flower. 

It's fun, vibrant and I love it!
We are looking forward to celebrate with her.

Happy weekend!

Sunday, December 11, 2011

Bake some and Get more!

Have you ever been to a cookie swap?

A friend of mine invited me to their 8th Annual Cookie Swap
Their swap began when her group of friends thought of baking cookies and exchanging them with others. 
She said some cookies were simple and some were really fancy.  They had so much fun that they did it the following year and the next making this year their 8th!
Since then, the group has increased in size as more and more friends and friends of friends attend.
I was so happy to be part of it - baking and all.  It was totally fun! 

The rules were simple:  Bake 4 dozens of cookies of any variety from scratch but no chocolate chip cookies.  I'm a big fan of chocolate chip cookies but yeah... it was nice to taste and be a fan of something else.

There were over 20 varieties of cookies and each of us got 2 pieces of a kind to put in our pink box.

There were a couple of interesting cookies - mainly because it was my first time to encounter such.
Pfeffernuse which is a German Christmas cookie made with molasses and honey.
Rugelach which literally means "little twists" are rolled cookies that are of Jewish (Polish) origin.
Strawberry preserve Kolaczki, a Polish jelly-filled cookie
Italian Pizelle which are Italian traditional wafer cookies.

Here is an incomplete list of what we had (hihihi.. Icouldn't decipher the blurred labels in my photos):
Potato chip cookies - Date nut adventures - Chocolate toffee shortbread
Oatmeal yogurt cranberry cookies - Coffee bonbons - Noche buena chocolate sandwich cookies
Coconut lemon stars - Coconut lime bark - Double chocolate drop stars
White chocolate cranberry macadamia nut

It was nice to meet new friends - some have been avid bakers for a long time and some were just beginners. 
The food was super delicous too that we didn't have room to eat cookies.
We were given a pink box where we placed 2 cookies of each kind. 
It was cookie frenzy!

Cookie frenzy!  Here's my Sweet and Tangy lemon cookies and my box of cookie stash.
Lots of cookies to try out!
I made Sweet and Tangy Lemon Cookies - the recipe that my mom got from our friend in Australia.  I love this cookie especially when it's warm and soft inside.  The lemon adds a lot of flavor and it really goes well with coffe or tea.

Now that we have all these variety of cookies, it's time to make some warm tea and coffee and share it with hubby.
Tomorrow, we start our diet and exercise.  Or maybe a week from today.

Looking forward to the 9th Annual Cookie swap.

Have fun!

Thursday, December 8, 2011

CF Art Swap

One of the polymer clay artists that I truly admire is the talented and quirky Ms. Christi Friesen (CF).
She recently held an Art Swap on her website and I joined!  Yay! 
 It was my first time to do participate in such a fun activity.

Her challenge was to "Create anything using polymer clay and at least one found object (you can use more found objects of course, and you can add any other accents/embellishments to your piece!) Make your piece no less than 1” and no more than 4”."

This was my entry:  "Floral Swirl Pendant."

The pendant was made using several colors of Premo sculpey that was conditioned, textured and sculpted to make a flower.  Mica powder was added to finish the design.
My "found objects" were gold wire and a washer.  I love adding swirls to my designs as you can see here.

The pendant hangs from a 16" brown double leather cord with a 2" extender chain.
A pinback was likewise added so that it can be used as a brooch.

This has been an exciting experience for  me.
I can't wait to receive CF's Swap original dragon dude (as she calls it) and my Art Swap partners work.

There were many wonderful works that were submitted.  Check out CF's website:

Happy claying!

Wednesday, December 7, 2011

Art Bead Scene Ornament Blog Hop

It's almost Christmas!
Have you put up your tree?  We have.  This year's motif is silver and blue.  Oh... how I love looking at Christmas trees and appreciating at how creative people can be.

Art Bead Scene has an Ornament blog hop beginning today.
Look at these ornaments made by author Heather Powers.  Aren't they gorgeous?  
These would actually go well with our tree.
Photo by Heather Powers at http://www.humblebeads.blogspot.com/
 I love the variety of colors and shapes of the ornaments below.
Photo by Heather Powers at http://www.humblebeads.blogspot.com/

Visit Art Bead Scene's blog and read the tutorial on how Ms. Heather made these.
I am inspired to get blue beads and make ornaments to add to our tree..

Happy crafting!

Wednesday, November 30, 2011

Winter 2011 Handmade Gift Exchange [Craftaholics Anonymous]

A few weeks ago, I blogged about the Handmade Gift Exchange hosted by Linda of Craftaholics Anonymous.  I joined and Yay!  I have a new friend who also love to make jewelry among other things.

I made her a bracelet made with brass plated chain and lampwork beads.
A locket and a blue briolette was added for that extra charm.


My partners favorite color is purple and green - great combo!
Hope she likes her gift.

100% Handmade.

I am lookig forward to the next gift exchange.  Thanks for adding me, Linda!

Tuesday, November 29, 2011

Mixed Media Art Jewelry [Floral Pendant]

Hello friends!
Don't you love mixed media in your jewelry?
I made this floral pendant from polymer clay, a washer and gold wire.

The flower was made using a combination of antique gold and alizarin crimson.  Gold mica powder was added for accent.   Turquoise polymer clay was likewise mixed with a hint of antique gold.
Finally, gold wire was added to complete the piece.
The pendant measures a 2 x 1.75 inches and hangs from a 16 inch 2-strand leather necklace.

Handcrafed with love.
Proudly Made in America.

All Polymer clay, mica powder, and paint were Made in the USA.

Thursday, November 24, 2011

Give Thanks [Thanksgiving 2011]

What does this photo remind you of?
Yes, the colors of Autumn / Fall and Thanksgiving.  
Table arrangement by my talented sis-in-law
Today is Thanksgiving Day in America and there is truly a lot to be grateful for.
You may want to read a BLOG that I wrote in 2010 when I celebrated my very first Thanksgiving in the U.S.

As of this writing, we are busy with preparations for dinner.  Being Filipinos, we have a wide varitety of food... such a gastronomic feast!  There will be turkey, fish, chicken, beef, vegies and a wide selection of desserts.  We will be singing songs and share about God's faithfulness.  To burn the calories, we will have a wii sportsfest and play mind games, probably cranium or scrabble.

I made these chocolate dipped peanut butter filled vanilla wafers for our giveaways. 
Yummy!

From our family to yours,
HAPPY THANKSGIVING!
Enjoy!

Thursday, November 17, 2011

Pearls and Metal

Don't you just love mixed media jewelry?
I love the look and feel of metal jewelry combined with elegant, feminine touches.

This bracelet's focal piece is the Vintaj copper ID bracelet blank that was embossed and finished to bring out its' luster. 
Faux pearls and german crystals were added to add a charm and elegance to this seemiingly rugged bracelet.


The bracelet has a hook clasp which makes it easy to wear.
Picture yourself pairing this with your power suit or your neat white collar shirt and jeans.
Enjoy!

Friday, November 11, 2011

Craft heaven on 11-11-11

Today is 11-11-11 and I am back to crafting after several days of being preoccupied with family health issues.  It's a challenge to be creative when our minds are somehwere else.  Do you think so?

I love adding texture in my cards; feeling the raised surfaces make me happy.  Today, I felt like Dry Embossing using my Martha Stewart's Kit.  It comes with 2 metal plates with various designs and borders, a stylus, cards and envelopes. 

You will need a table lamp to make tracing easier.  A glass table with a light underneath would work well too.  If it's bright and sunny outside, you may try taping your stencil on your window and emboss - just be mindful of your neighbors who might find you a bit odd.

I added Ranger's distress ink in Antique Linen to the border and highlighted the
design using colored pencils.

The design was layered on a green mat and finally on an ivory colored cardstock.
A punched out vase adhered by dimensional adhesive completes the design.

This card is for an 80+ old lady who will be celebrating her birthday tomorrow. 

Accents were added using Tombow ABT markers.

Happy weekend!
Enjoy!

Sunday, November 6, 2011

Galena and Vintaj [Metal Art & Melt Art Workshop]

In the quest of knowledge, we took a 2.5 hour drive northwest to the beautiful city of Galena. IL. 
 It was my second time to visit the place, this time with my husband.  I love the vibe of the city, full of history, art, beautiful architecture and one of a kind specialty shops.


Photo credit:  http://www.visitgalena.org/


 It reminded me of Sausalito in California and Stanley Bay in Hongkong.

Photo credit:  http://www.visitgalena.org/

It was an exciting day of workshop with Vintaj:  Metal Art and Melt Art Techniques. 


I was so thrilled to meet our very talented teacher, Ms. Jess Italia Lincoln. 
She taught us many techniques that produced stunning accessories.

This weekend was just awesome!  We were blessed with great weather, a pleasant trip, wonderful people and a ton of inspiration.

Happy crafting!
Enjoy!

Friday, November 4, 2011

Handmade Gift Exchange

Hello friends!
It's that time of the year when we make and wrap our gifts for that special someone.

Join Craftaholics Anonymous' Handmade Gift Exchange and bring joy to a fellow crafter.
 

It's my first time to join and I'm very excited about it.
You can read more details HERE.

Happy crafting!
 Enjoy! 

Wednesday, November 2, 2011

Tutorial: Making Perfect Wire Loops

When I started making jewelry, I hated making wire loops.  My teacher made perfectly round loops that looked so easy but mine were always oblong with dents on the wire from too much uncoiling. 
My beginner loops were never perfectly round.
Practice... practice... practice... (not to mention callouses on my fingers).

Tools and Materials
Flat / Chain nose pliers
Round nose pliers
Wire cutter
Wire or headpins -  I used 1 inch head pins
Beads -  Make sure that your bead/s leave enough wire for you to work with

Steps (kindly refer to the photos):

Insert the bead/s into the wire then with the chain nose pliers, create a right angle bend.

With the round nose pliers held in the horizontal position, grab the wire leaving about 15 mm and twist to make a circle around the jaw of the pliers.  You may adjust the size of the loop by adjusting the pliers (narrow tip and broad base).

When you read the halfway point, reposition the round nose pliers to a vertical position and complete the loop.
Insert the chain, connector or whatever before completely closing the loop.


It entails one smooth wrist movement.  With practice, you will make perfect loops and when you do, you will be addicted to it.

There are days when I just want to make loops and it really becomes handy during times when I am in a hurry to finish a project.


Loop away!
Oh, don't forget to wash your hands after handling too much wire and moisturize those creative hands.

Happy crafting!
Enjoy!


Monday, October 31, 2011

Tanjoubi Omedetou [Happy Birthday in Japanese]

Have you seen this clear stamp set from HeroArts?  It's so cute!

One of our famly members is celebrating her birthday so I decided to use the stamps for her card.

I stamped the Japanese girl on white cardstock and the robe on a green patterned origami paper using Versafine ink.  I added a green bling-bling on her hair.
The paper lamp was stamped in white cardstock and colored using Tombo ABT markers.  I added embroidery floss for on the top and bottom of the lamp.
The sentiment is from HeroArts too.

I layered these elements on a designer paper and then on an off-white cardstock that was distressed with Ranger's bundled sage.

Have a great week of crafting!

Enjoy!

Thursday, October 27, 2011

Gold Flower Polymer Clay Pendant [Chatoyant Mica Shift Technique]

Do you love holographic designs?  There is a polymer clay technique called Chatoyant Mica Shift that creates three dimensional or holographic effect using metallic sheets of clay. 

This technique is credited to Pier Volkus and Mike Bessler.  The effect happens when the mica flakes in the metallic clay are shifted when stamped on, hence the name.  After stamping, the raised areas are gently scraped to reveal a smooth and holographic image of the stamp.

I stamped Premo Antique Gold polymer clay with a floral themed stamp and gently scraped the raised areas.  Premo Black clay was used for the base.  The pendant was cured and Lisa Pavelka's Magic Gloss  was added to complete the piece.


A 24 inch leather cord or cable chain can be added to complete the piece.

Enjoy!

Tuesday, October 25, 2011

Twist and Turn [Makin's Clay Extruder Tutorial]

Yay!  I have a new tool for my polymer clay adventure:  a Makin's Professional Ultimate Clay Extruder.  There are many blogs and articles on different brands of clay extruders, stating the pros and cons between the brands.  I was surprised to read that for some brands you have to get a caulking gun to help extrude the clay.  When I saw and read about the Makin's clay extruder, I decided to give it a try.

The Makin's extruder is color green and has a ridged surface which aids your grip during use.  It includes 20 discs with different shapes including square, round, flat, and screen discs.  You can use it to make hair, ribbon, weaving, beads, etc.

I have always wondered how to make canes without having to mix too many clays, rolling, reducing, etc.
Here's a tutorial on how to do that using a clay extruder. 

First, condition different colors of clay (I used Premo' turquoise, alizarin crimson, black and beige clay) and cut them with a round cutter. 
Put them inside the clean  barrel of the clay extruder and use a square disc.  Extrude the clay and be amazed at the color combinations.

TADA!


You should see my face when I saw the resulting color combo.  This was an awesome technique.

Do come back to see what I've made with these pretty babies.

Happy crafting!

Enjoy!

Monday, October 24, 2011

Twirling Paper once again [Paper Quilling Floral Arrangements]

Like many crafters, I have accumulated so much stuff over the years. I spent the past several days sorting through my boxes of hidden treasures and found my paper quilling materialas and tools.  Suddenly, I was back to twirling paper once again.

I was introduced to paper quilling in the Philippines several years ago.  Basically, it's just twirling paper through a needle or a slotted tool.  There are so many things and designs that you can make out of it:  flowers, leaves, animals, party stuff, etc.


I found my kit from Lake City Craft Co.:  Pretty Fringed Blossoms #215 designed by Jane Hui Cuan Wu and decided to make 2 of the arrangements.  The woven baskets are just pretty.


I love the colors and design of this second arrangement - it's so cheery!

I am thinking of designs that I can incorporate in our thanksgiving and Christmas cards. 
Have you tried paper quilling?  Give it a try and share it with me too.

Enjoy!
Happy crafting!

Tuesday, October 18, 2011

Floral Barrettes [Polymer Clay and Metal Barrettes]

On a cold and dreary day, I decided to make an inventory of all my jewelry and craft supplies.
Among my stash were metal barrettes that were calling me to rescue them from their bare state.
And so I did.

I conditioned Premo black polymer clay, added texture and layered turquoise dots and millefiori flower canes.
The design was inspired by a designer paper that I also used as the background of the photo.
The polymer clay was baked with the metal barette and was secured after baking using superglue.
The barette measures 3 1/2 x 3/4 inches.

I'm on barrette mode.

Enjoy!
Happy Crafting!

Friday, October 14, 2011

Turque Locket [Turquoise and Red Necklace]

The combination of Turquoise and shades of Red is always a perfect choice.
This necklace combines polymer clay, metal locket, chalk turquoise and crystal beads.

The round locket pendant measures 1.25 inches in diameter.  I added Premo' turquoise polymer clay, stamped and decorated it with red shades of floral canes.  The back of the locket is covered with plain turqouoise polymer clay that was stamped with the same image as the front.
   

The chain is silver and measures 29 inches.  The design of the necklace is completed with the addition of a toggle clasp, 10 mm chalk turquoise beads and 4 and 8 mm red crystal rondelles.

The necklace hangs beautifully. 
The asymmetrical design draws the eyes to the pendant which  brings about cohesiveness in the design.

Enjoy!

Thursday, October 13, 2011

Christmas in the Air Part 2 [2011 Christmas Cards]

I stamped more for our Christmas holiday card stash!

The stamped Christmas sentiment on the center of the card reads: 
"May the wonder that is Christmas touch the child within your heart."

I added a stamped wreath border that I distressed and colored with pencils.
I used gold, green, and red for the mat.
This was then layered on an ivory cardstock.


This card uses an acrylic stamp from Hero Arts.  I layered it with a red origami paper and green mat.
Blue snowflakes were stamped on the background of the ivory cardstock.

Just a few more to go and we're all set for Christmas.
Oooops... got to do our Thanksgiving cards.

Happy crafting!

Wednesday, October 12, 2011

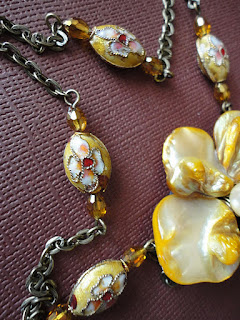
Cloissone & Mother of Pearl Necklace

You must have noticed that I love using Cloissone' beads many of my jewelry designs.  The variety of colors of the bead makes it exciting to design with. 


This is a piece that I made using yellow oval cloissone' beads, crystals and a floral mother-of-pearl accent.

It's simple.

It's Pretty.

It's 100% handmade.