Showing posts with label 2014. Show all posts

Saturday, May 10, 2014

[Bead Soup] Its the 8th Bead Soup Blog Party 2014 Reveal Day!!!

http://www.prettythingsblog.com/2014/05/welcome-to-8th-bead-soup-blog-party.html

Welcome to the 2014 Bead Soup Blog Party hosted by Ms. Lori Anderson of Pretty Things Blog.  

This is my 4th party and this year, I was paired with Peggy of Charm Barn.  I love the assortment of bright and interesting beads and findings.  She gave so much beads that I was able to make 3 pieces and have leftover beads for another project.

One of the focal bead that she sent is a "nest."  I've always wanted to have one and finally, I got it! This necklace is called "Nestled" and is a combination of the red creek jasper, pink stones and beads and wire.  The wire nest houses a stone and since it's Mother's Day, let me share my story.  My 2 siblings and I live in different countries and my parents are on their own.  The stone inside the nest signifies that no matter where we are, the 3 of us are safe and secure in our mom's heart.
"Nestled"
8th Bead Soup Blog Party 2014

One of the clasps she sent had crystals on it.  Very nice!  I like the combination of the pink beads against the stone.
"Nestled"
8th Bead Soup Blog Party

Take a look at these cute silver spacer beads.  Is it a bird, a whale or a fish?  LOL.  I wanted to do something fun and colorful with it and since I had light blue and purple hemp cord available, I made a macrame bracelet with a sliding knot closure.  The ends were finished with a silver bead.  Fun!  Fun!  Fun!
Macrame Bracelet
8th Bead Soup Blog Party 

And finally, I made this statement bracelet.  It started out with making a wire base using a thick gauge wire and then adding the rest of the beads.  I formed the base flower using Vintaj copper wire and filled it up with crystals and pearls.  Then the finished flower is placed and wired on top of the frame.  It sits on the wrist nicely and the pop of color shouts "Spring!"


Wire-Wrapped Floral Bracelet

Thank you for stopping by my blog.  Please head over to my partner, Peggy of Bead Charm to see what she's made.  Click on this LINK to see the rest of the participants.  

I would like to thank Ms. Lori for all her hard work in making this party possible.  

Have fun!
michelle

Sunday, May 4, 2014

[Baking] Chocolate Lava Cake

Chocolate Lava Cake
If there is one person who loves cholocate-y desserts more than me, that would be my husband.  It's his birthday and I thought of baking something extra special... just for him.  We have gained so weight in the past several weeks and it's mostly because of our physical inactivity, being sedentary most of the time.  Yes, I have been baking here and there but it's always "to share" with family and friends.  Well, this Chocolate Lava Cake Recipe is served in ramekins, small enough for one person.  Talk about portion control.

There are many recipes online.  I did my research and came up with my own.

Chocolate Lava Recipe (serves 4, 6oz ramekins)
Ingredients:
2 large whole eggs
2 egg yolks
1/4 cup sugar
2 Tbsp all purpose flour
1/2 tsp vanilla
1/8 tsp salt
3.5 oz Scharffen Berger Bittersweet dark chocolate, cubed
4 oz unsalted butter, cubed

Procedure:
1.   Preheat oven to 450C.  Line ramekins with butter.  The ramekins we have are 8oz and are wide rather than tall - I was able to make 3 portions.
2.   Place butter and chocolate squares in a glass bowl and melt in a double broiler (just because we don't own a microwave).   Mix well.
3.   Beat the whole eggs and eggyolks until pale yellow.  Add the sugar and beat until completely dissolved.  Add the vanila and salt.
4.   Pour the chocolate mixture into the egg mixture and combine.
5.   Fold in the all purpose flour.  Mix.
6.   Gently pour the mixture into the prepared ramekins.  The cake will be baked in a water bath (baine marie) so place the filled ramekins in a deep dish filled halfway with hot water.
7.    Bake for 15 minutes.  Your cake is done when the sides are firm to and the center is soft (and jiggly).
8.   Take the cake out of the oven and gently run a knife along the side and place a plate and carefully invert the cake.
9.   Sprinkle powdered sugar and top with your favorite fruit (I used mangoes).

It was delicious and my birthday boy loved it!

Enjoy!  Happy baking!
michelle

Sunday, April 27, 2014

[Baking] Mango Chiffon Cake

Mango Chiffon Cake

Spring in Texas means the start of the season for Mangoes.  Woohooo!  I love mangoes especially the sweet ones.  The Mango Chiffon Cake is one of the more popular desserts in the Philippines.  I have several favorite mango desserts:  Mango PavlovaCanonigoConti's Mango Bravo, and Mango ice box cake to name a few.

Ms. Corrinne has a Mango and Cream Cake recipe that I've tried and tweaked a bit to call it my own. I lessen the sugar by 1/2 - 1 tablespoon to lessen the guilt and I add cubed mangoes in the batter on days when I feel extra special.

MANGO AND CREAM CAKE from Ms. Corinne of Heart of Mary
(recipe suitable for two 9" by 2 1/2" round pans, or one 10" by 3" round pan)
Chiffon Cake:
{A}
2 1/4 cups sifted cake flour
3 teaspoons baking powder
1 teaspoon salt
3/4 cup white sugar

{B}
1/2 cup corn/canola oil
7 egg yolks, from extra large eggs, at room temperature
2/3 cup water 
1 teaspoon vanilla extract
1/2 teaspoon lemon or orange extract

{C}
7 eggwhites
1/2 teaspoon cream of tartar

{D}
3/4 cup white sugar

Procedure:
1. Preheat oven to 175 degrees Celsius. Line bottom of baking pans with parchment paper.  Do not grease pans.
2. In a large bowl, combine {A} well. Add in {B}. Beat with electric mixer or by hand until smooth and well blended.
3. In a separate bowl, beat {C} on high speed until frothy. Gradually add in the sugar {D} and beat until stiff peaks are formed. Gradually and gently fold in egg whites into egg yolk mixture. Pour batter into baking pans.  If using two 9" pans, divide the batter equally.
4. Bake for about 55 minutes or until top springs back when lightly touched. Invert pan into wire rack immediately and cool completely.
5. To release cake from pan, carefully run a thin knife around sides of pan, then invert. For easier handling, wrap your cake very well in cling film, then refrigerate overnight before frosting.

Mango Whipped Cream Frosting:
2 cups whipping or thickened cream, very cold
1 250g bar of cream cheese, soft but still cold
1/2 cup sugar
1 teaspoon vanilla extract
about 3 medium-sized mangoes (more if you love mangoes!)

*Make sure your mixing bowl and beaters for the whipped cream are all well chilled to achieve better volume.

Puree mango meat of one mango.  Set aside.

In a small bowl, beat the cream cheese until smooth.  Set aside.

In your chilled bowl and using clean beaters, beat the whipping cream, sugar and vanilla until the mixture is quite stiff. Gently fold in the cream cheese then beat again at high speed for a few seconds or just until everything is well combined.  Be careful not to overbeat.  Carefully fold in the mango puree.

To assemble:
Cut up the rest of your mangoes into small cubes or thin slices (whichever you prefer) to use for the filling and for garnishing.

Place one cake layer on your cake board, top side up. Use some of the frosting to fill the cake.  Scatter the mango cubes/slices all over the filling.  Place the top cake layer over the bottom layer, bottom side up.  Frost the cake with the remaining whipped cream frosting, decorate as desired and garnish with more mango cubes/slices.
------------

I love that it comes out fluffy, soft, delicately sweet and is always a hit among friends and family.  Try it soon.

Have a wonderful week!
michelle

Monday, April 21, 2014

[Baking] Pavlova

PAVLOVA
Four years ago, we visited family in Australia where I had my first taste of this delicate dessert:  Pavlova.  It is a meringue-based dessert with a crisp outer shell and gooey, marshmallow-like on the inside.  They say that the dessert was created in honor of a ballet dancer Pavlova, hence the name, during her dance tour in Australia and New Zealand.

The recipe is different from the regular meringue recipe in that it uses cornflour which causes the center to be gooey.  It is also baked for a long time, 90 minutes, and cooled in the oven.  The recipes in the internet are basically the same.  I used this one by Catty.

PAVLOVA (adapted from The Catty Life)
4 large egg whites
1 cup caster sugar
1 teaspoon vinegar
1/2 tablespoon corn flour
300-500 mL whipping cream 
1 1/2 cup strawberries
1 cup blueberries
1 piece kiwi
1 mango (pureed or diced)
  1. Pre-heat oven to 120°C/250°F.
  2. On a sheet of parchment/baking paper, draw an 8″ diameter circle. Turn over, or place another sheet on top but make sure you can still see the circle.
  3. Separate egg whites from the yolk and place in a clean large mixing bowl. Beat at a medium to high speed until soft peaks form. 
  4. Gradually add in the sugar while still beating and continue to beat until stiff peaks form. Your mixture should now be a smooth meringue.
  5. Sprinkle vinegar and corn flour over the mixture and fold in with a spatula.
  6. Using a spatula, spoon the mixture onto the prepared baking tray and baking paper keeping the meringue inside the circle. Smooth over and try to make the outside edges slightly higher than the inside edges.
  7. Bake meringue in oven on a middle shelf for 90 minutes. After 90 minutes, turn off the oven, leave the oven door slightly open and leave pavlova to cool for 2 hours or over night if possible.
  8. When ready to serve, beat the whipping cream in a large bowl until it becomes firm enough so that it can hold itself up. Spread across the top of the pavlova.
  9. Wash and prepare strawberries, blueberries and kiwi.  I wanted to use passion fruit but since we don't have any, I pureed a mango and drizzled it on top.
It was yummy!!

Enjoy!
michelle

Tuesday, April 15, 2014

[Challenge] A Whimsical Eggciting Birthday!


Today is an "Eggciting Day" for me and the blog because it's my birthday!   Wooohooo.  Thank you for all 
your love and kind greetings.  Early this morning, we were able to catch the first of the Four Blood Moons - NASA says that seeing four complete lunar eclipses in a row is very rare and we will have one every 6 months until October 2015.  We have never seen one so we stayed up late for it and it was amazing! We just stood in awe at how great and might God is - He who created the heavens and the earth.

This project is part of the Philippine Polymer Clay Guild's "Something Whimsical Challenge" and Martha Stewarts "marthasgoodeggs" intsagram post.  The first challenge for me was to figure how to remove the contents of the egg while keeping the shell intact.  So, I did some research and ewwww... it was totally gross!  Let me be graphic here:  make 2 holes on both ends of the egg, burst the egg and mix it up with a needle tool and finally blowing the contents out.  Now don't tell me I didn't warn you.  Anyway, after cleaning and drying the eggshell for 24 hours, I got to work on it.

Friends, meet "Mini-Me."  Oh, isn't she cute?  She's having a wonderful time strolling with her yellow birthday balloon, enjoying the sight of bluebonnets and other wildflowers.

This is made from 100% Premo sculpey polymer clay using the applique technique which is a very tedious and meticulous process that takes a lot of patience, gentle hands and the ability to hold your breath for a long time.  The latter helps to concentrate in order to be precise in putting the components in place.  Whew!

May your days be blessed!
michelle

Thursday, April 10, 2014

Thoughts on Love


Wishing your days are filled with love and joy.
♥  michelle  ♥

Wednesday, April 9, 2014

[Events] "Gone Fishing" Party Theme

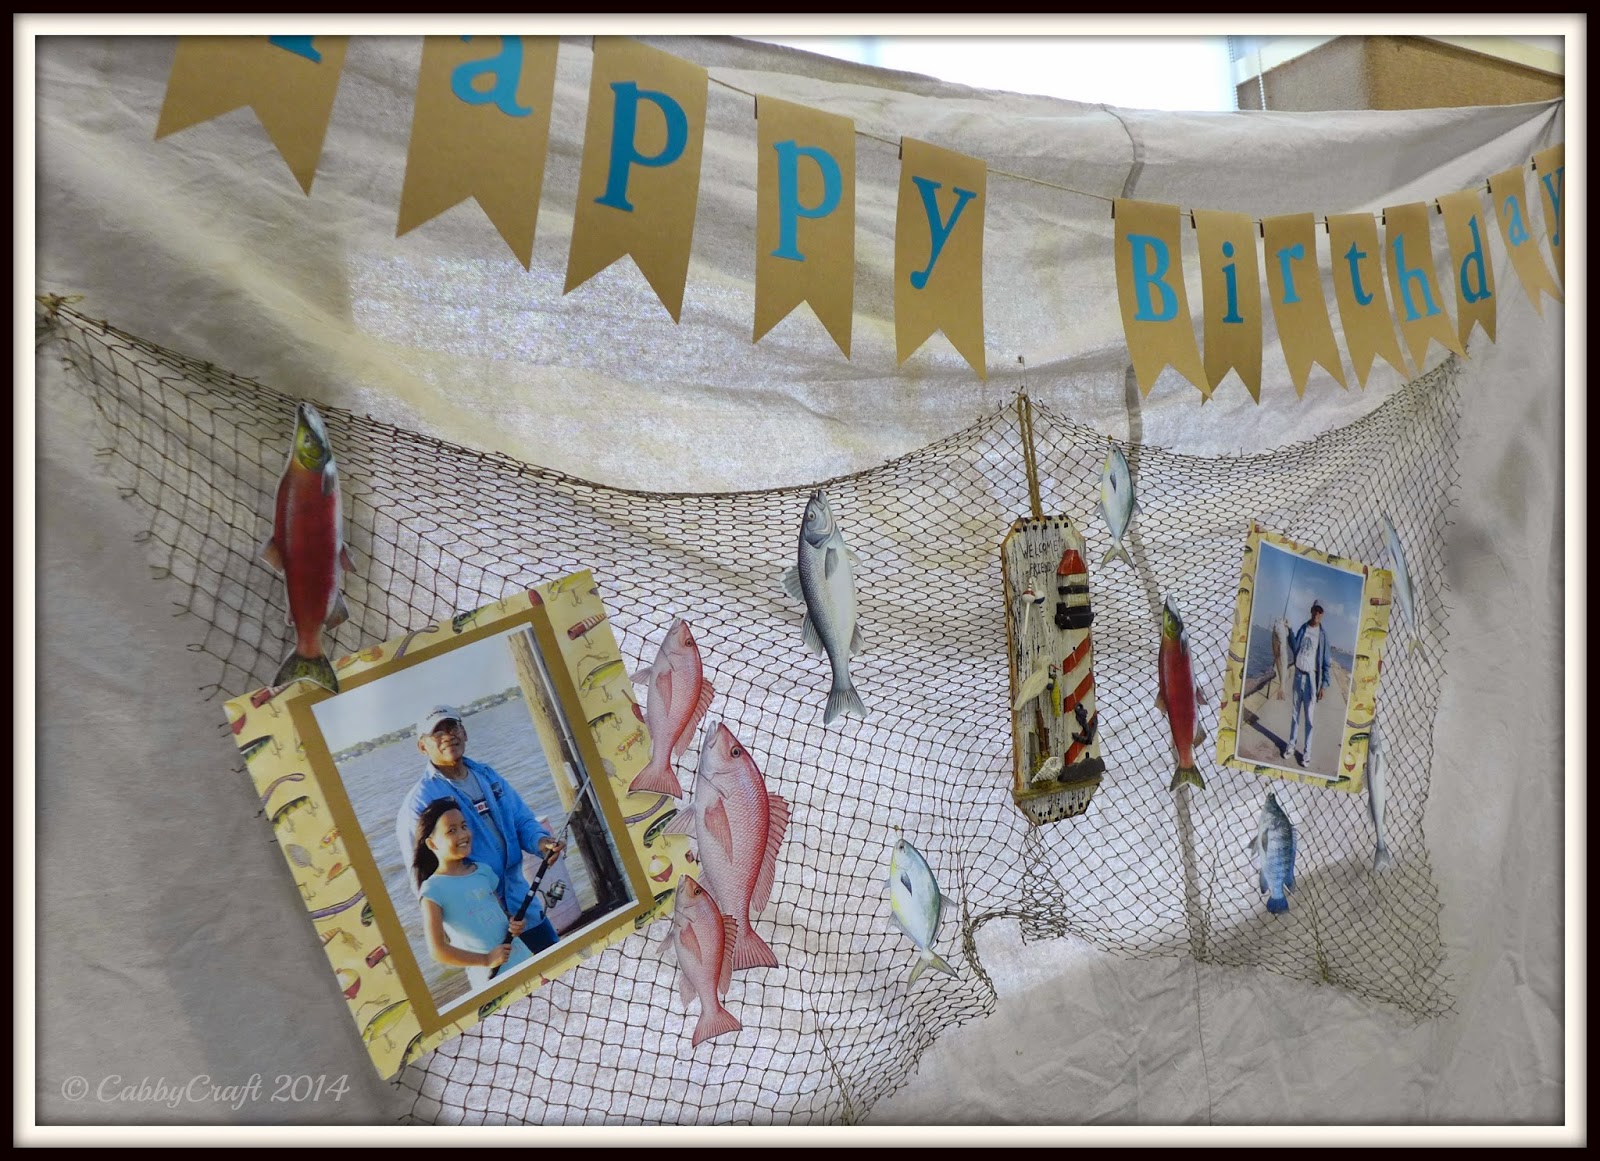
A couple of weeks ago, we decorated the hall for a 70th birthday celebration with a Fishing Theme.  Oh, we had fun decorating!  We wanted the backdrop to be colorful and fun so we used buntings, a decorative fishing net, a wooden lighthouse wall decor, colored prints of different kinds of fish and photos of the celebrant.  You can see the how to make the buntings HERE. 
Fishing Party Buntings and Decorations

One of his fishing buddies brought a life-size fisherman, complete with waders, fishing poles, nets, etc!  Oh, he looked cute, especially with his hat and shades.  The cake was nicely done and the food was delicious too.
Fishing Party Decorations

These are the centerpieces.  I used tall vases filled with river rocks.  We covered the outside with this beautiful fabric made by Hauptman fabric and tied it with twine.  We added wooden twigs to serve as fishing rods, and tied red and white wobblers with nylon.  Finally, we glued on fish biscuits.  So adorable!
Fishing Party Decors
Centerpiece
Oh boy... we had too many parties to attend to in March.  What have you been up to?  Have fun!

Blessings,
michelle

Tuesday, April 8, 2014

[Diaper Cakes] Kohl's Cares Go Dog, Go Diaper Cake!

Motorcycle Diaper Cake
Kohl's Cares Go Dog Go!
Meet our little Rock Star Go-gol that I got from Kohls Cares a few months ago.  This motorcycle diaper cake is similar to the one that I made HERE.  Isn't he cute?

Rock On!
michelle

Monday, April 7, 2014

[Scenes] Sunshine, Bluebonnets and Wild Flowers

My husband and I love to go on road trips.  We have developed a system from what vehicle to rent, where to stay, what snacks and drinks to bring, which rest area to go to, and what music to play, etc. On our recent drive to San Antonio, Texas, we noticed pretty patches of colorful wildflowers along the highway.  It took us time to look for a safe spot where we can stop and take photos up close. 
Bluebonnets
San Antonio, Texas
These are Bluebonnets, the State flower of Texas.  They bloom in spring and can be seen along the highways and farmlands.  Oh, I love them!
Bluebonnets
San Antonio, Texas
These red widflowers are called Indian Paintbrush and they may be seen mixed with bluebonnets and others.  Don't they look so pretty together?
Bluebonnets and Indian Paintbrush
San Antonio, Texas
Pretty soon, these wildflowers will be gone and we'd have to wait for next Spring to see them again. This reminds me of a verse in the Bible:
Isaiah 40:8
"The grass withers and the flowers fade, but the word of our God endures forever."

Have a wonderful day!
 michelle  ♥

Saturday, April 5, 2014

[Paper] B&B Wedding Wishes

It's been quite some time since I made a Wedding card.
This is for B&B.
Handmade Wedding Card
This is a folded 5x7 inch ivory cardstock.  I printed their photo and added a mat using kraft paper.  The background is teal that I dry embossed using my Sizzix folder.  Then I used Denami Sparklets ultra fine glitter.  The sentiment is a sticker from Stampendous that was placed on a bright pink banner.
The inside of the card also has a sticker saying "Best Wishes."

It's a simple card but I like how personalized it is.
Such a fun and loving couple.
May God bless your union forever and ever.

Love to all from
michelle

Friday, April 4, 2014

[Baking] The Pampered Chef Valtrompia Bread Tube

Do you go to garage sales?  We are having one at Church this weekend to raise funds for a Mission trip.  I had fun arranging the clothes, household items, toys, shoes, bags and home decor.  Look what I found - The Pampered Chef Valtrompia Bread Tube Star and Flower.
The Pampered Chef Valtrompia Bread Tube Flower
The Pampered Chef Valtrompia Bread Tube Star
It was love at first sight... they're brand new, fresh from the box.  I don't know how to use it yet but I'm thinking of making something like a modified pound or chiffon cake.  Come and visit us soon to see our review.

Have a great weekend!
michelle

Thursday, April 3, 2014

[Cooking] Rick Bayless' Mojo De Ajo

This is Mojo de Ajo or Liquid Gold as Chef Rick Bayless calls it.  I came across this recipe while watching his cooking show.  This is the second time that I made it and it's a hit!


Recipe adapted from Chef's Frontera.
Ingredients:
4 heads of garlic - I used the large ones 
2 cups olive oil
1 teaspoon salt
1 teaspoon chili flakes or chili powder
1/2 cup fresh lime juice or calamansi juice

Steps:
Heat the oven to 325.
Break the heads of garlic and peel off the skin.
Stir together the garlic, oil and salt in a pan.  Slide it into the oven and bake until the garlic is soft and lightly brown, about 45-55 minutes.  Add the lime or calamansi juice and return to the oven for 20 minutes for the garlic to absorb the line and turn brown.

Using a potato masher, mash the garlic into a coarse puree.  The mixture is ready to use and will stay good for 3 months.

You may use mojo de ajo in making stir fry vegetables or pasta sauce.  It is very flavorful and aromatic.  Try it!

Enjoy!
michelle

Wednesday, April 2, 2014

[Beauty] Hair Updos

Before you read any further, let me warn you that this is a very hairy article.  LOL.

We will be attending a wedding this weekend and I have been thinking of what to do with my medium length hair.  I've never had my hair this long and I want to play with it before I finally decide to have it cut.  

There are several websites and videos that feature different tutorials. Cinthia has caught my attention with her easy to do updos and videos.  Here are 3 of my favorites from her site:

Check out this Easy Elegance Hair Bun.  Isn't it gorgeous?   Simple but very elegant.
[via]
I am loving this Easy Messy Updo style.  It's modern and chic.
[via]
This messy side bun is also modern and very sexy.  Cinthia makes it look very easy to make in her video but I got to try doing it myself.
[via]
So what do you think?  Well, I went to the store and splurged on a lot of bobby pins, hair ties, a new hair brush, some other hair stuff and a L'Oreal lipstick.  Crazy huh?  Yes, it was my girly girly day.

Here's wishing you a great hair day!
michelle   

Tuesday, April 1, 2014

[Tutorial] DIY Happy Birthday Banner

Wow, today is April Fools Day and it marks the start of my birth month.  Yipee!  Oh yeah...  
Happy Birthday to Me!
DIY Birthday Banner
This is a handmade banner that I recently made for a friend while watching "Castle."  Yes, I usually make crafts while listening to music, watching a tv series or a movie.  Don't you?  Tell me about it.  

So, let's start!  Here are the materials and tools that you will need:
Cardstock - I used 2 shades of Teal and Kraft cardstock, 3 pcs
Glue, Tape
Twine

Tools:
Cricut machine and a font (Cricut Base Camp) cartridge
Martha Stewart scoring board
Martha Stewart centering ruler
Fiskars rotary cutter

Steps:
1.  Determine the size of the letters that you want for your banner - I used 4 inches in this particular project.  You may print the letters manually or use a cricut or a similar machine - I used cricuts' Base Camp font here. 

 2.  Prepare the banner by cutting cardstock into 3.5 x 8 inches.

3.  Adhere the letter, making sure it is centered.
 

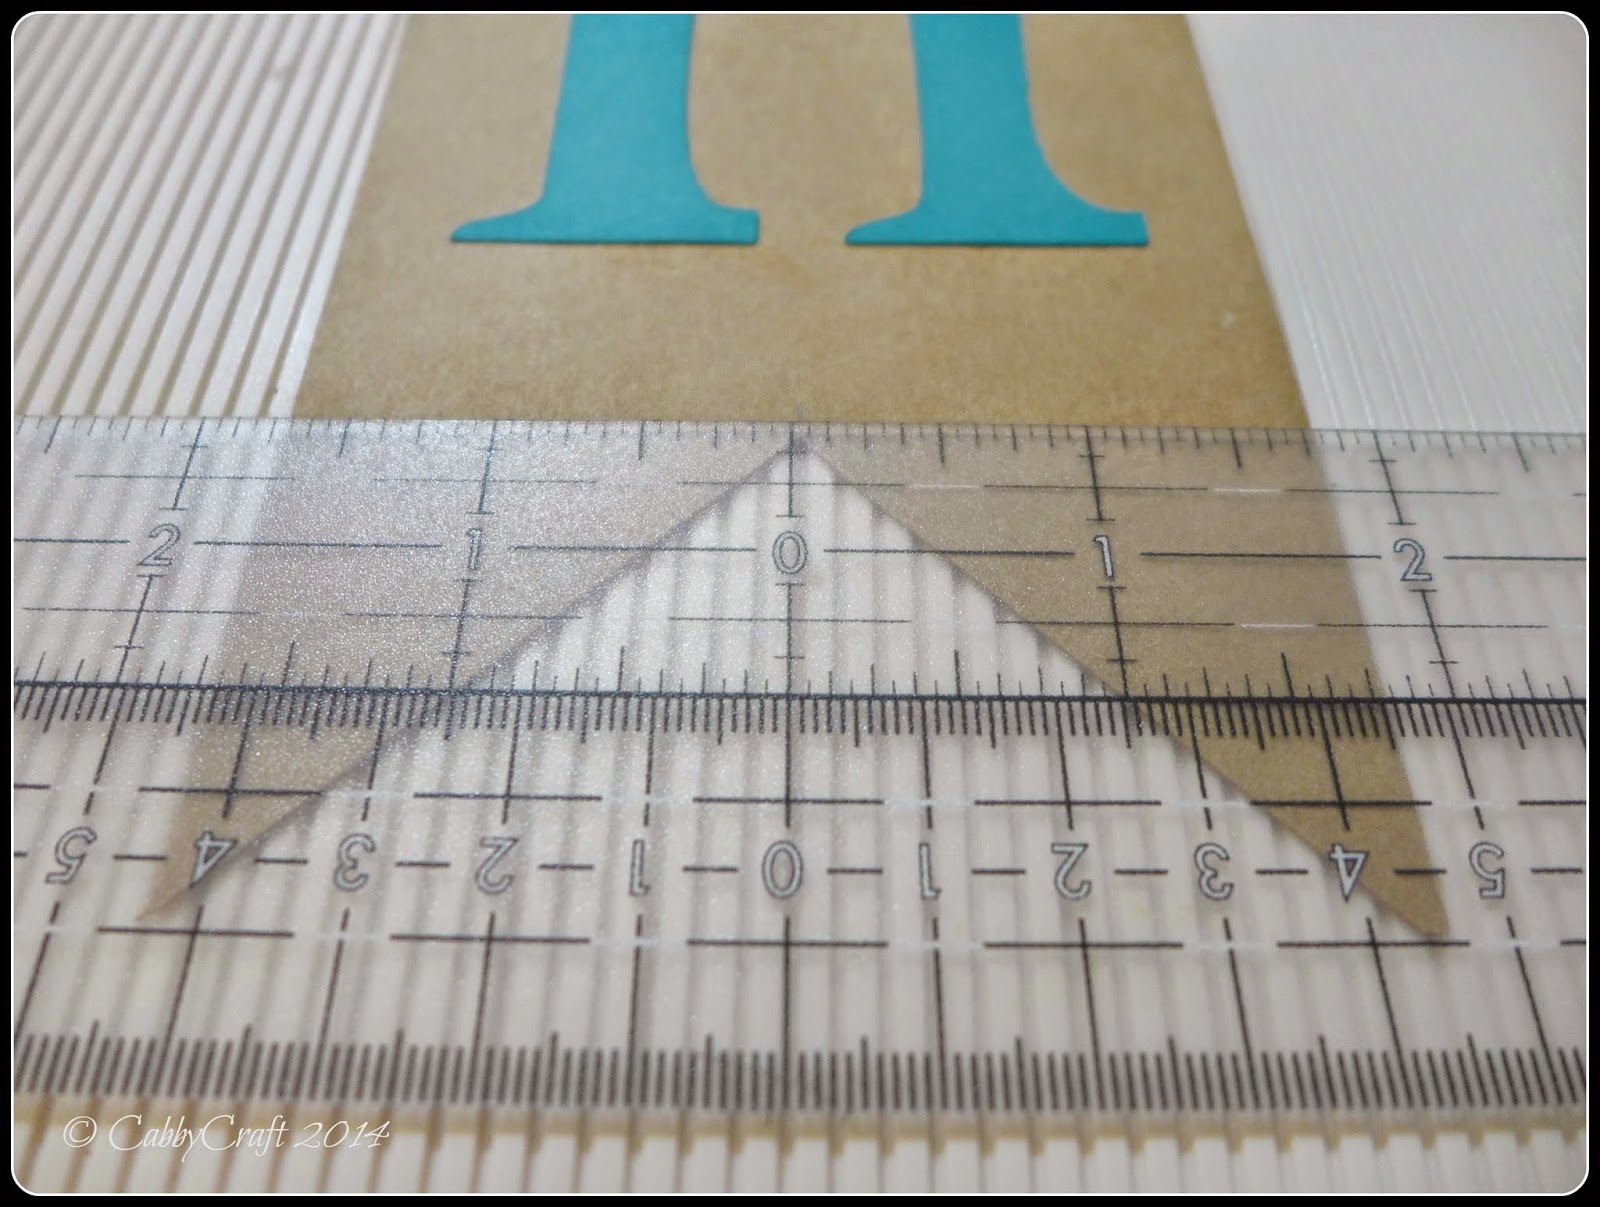
4.  I measured 1.5 inches from the bottom of the banner, got the center and cut one corner to the center, creating an inverted "V" shape.  You may adjust the height according to your preference, that is, depending on how long you want the tail to be.  I love using my MS centering ruler because it makes it so much easier,
 5.   To make the top flat for the string, measure 0.5 inches.  Score and fold.
6.  Fold the top flap and secure it with an adhesive or tape.  I used hemp cord because the party theme for this project was kinda rustic.


That's all, folks!  It didn't take long to make and wasn't costly at all.  Come back soon to see how we made used of this.  Enjoy!

Happy crafting!
michelle


Monday, March 31, 2014

[Challenge] CF Originals Mica, Chalk Powder and Glitter

CF Originals Booty Call
Ms. Christi Friesen challenged the followers of CF Originals to a contest from 3/18 to 3/31/2014.  She wanted us to create works of art using chalk powder, glitter and/or mica powder.  This brooch/pendant was my entry that I submitted yesterday... oh yes, the day before the deadline.  I used a beautiful texture plate and added shades of red, blue and green mica powder.   The geometric lines, curves and wiring makes the piece visually interesting and sexy (in my opinion).

Can you believe that it's the last day of March?  More to projects come next month!
Happy crafting!
♥ michelle

Tuesday, March 25, 2014

[Bead Soup Blog Party] The 8th BSBP with Peggy

What's cookin'?
8th Bead Soup Blog Party
Oh yes!  It's the 8th Annual Bead Soup Blog Party hosted by Ms. Lori Anderson.  This is my 3rd year to participate and my partner is Ms. Peggy Johnson of Charm Barn.  It is her first bead soup blog party and I am excited for her.  She sent me a wonderful and delicious assortment of beads, findings and components.
Beads, componenets and mixed media pendants
This is gonna be fun and I think I will be making a couple of necklaces, bracelets and / or earrings.  I love the bright colored beads, perfect for spring and summer. 
[via]
These are what I sent Peggy.  I sent her a color assortment that is different from what she likes (pink) but I hope she enjoys working with it.  The pendant was made from polymer clay.

The reveal day is on May 3rd and I hope to see you then.  Happy beading!

Saturday, March 15, 2014

[Bottles of Hope] Spreading Good Cheer through Art

"Hello.  My name is Princess Zita.  Would you like to have tea with me?"
"Have Tea with Me"
Polymer Clay
Isn't she adorable?  She is going to a special patient as part of Bottles of Hope.  The Bottles of Hope project started in  1999 by Diane Gregoire, a polymer clay artist and cancer survivor who used her talents to bring cheer to cancer patients by covering glass medicine bottles with art and giving it to them.  The members of the Houston Polymer Clay Guild has been actively participating in this endeavor.  I always look forward to coming to the guild once a month to chat, to learn and to see what projects the others have done.
Houston Polymer Clay Guild
Bottles of Hope
March 2014
Look at these unique pieces of art.   There are a variety of techniques that were used to make each bottle - oh, the wonderful world of making canes! 
Houston Polymer Clay Guild
Bottles of Hope
February 2014
Last February, I made a bottle using colors that were southern/rodeo inspired.  I also added rope and tassels.  As always, all the bottles were beautiful but one of the hits that brought us to the moon (no pun intended) was this NASA astronaut... oh, the details on the logo and flag were just amazing!

It is my prayer that each bottle of hope would bring love, joy and a sweet smile to each recipient.

Blessings!
♥ michelle

Saturday, March 1, 2014

[Events] Head Over Heels Surprise!

Do you remember this necklace that I made for our dear friend on her "Surprise High Heels Party?"  I forgot to show you how we decorated the hall for the celebration.  She loves wearing high heels so we decided to make it our theme and used gold, black and white.  The topiary centerpiece were handmade using gold and white tissue paper, wooden dowels, faux flowers and crystals arranged in a tall glass vase with stones and moss. We printed pictures of high heels and I applied Ranger's glossy accents to make it look oh so shiny, just like most of her shoes and adhered it to the glass centerpiece.  We made a total of 20 which really looked pretty.  The giant shoe on the background was  painted on a foam core board and adorned with red and white flowers.  The "Happy Birthday" sentiment was made using cricut.
Golden Birthday Celebration
Black, Gold, White
DIY decors
The letter blocks were handmade as well -  we painted it black with a gold trim.  There were a lot of guests so we had to figure how to best arrange the round and rectangular tables, 2 sets of buffet tables, roast pig carving table, dessert table and the sound booth.  It turned out pretty well.  We placed a separate presidential table which allowed them to have a perfect view of the program.  The cake was orange chiffon made and beautifully decorated by Jane&Jill.   

Oh it was wonderful to see her so happy, being surrounded by so many people who love her.  Husband and I were super tired but it was the "good kind of tired."  This was my first major events arrangement and (pardon my boasting), it was beautiful!  

Soli deo gloria!
♥  michelle

Friday, February 28, 2014

[Challenge] P3 February 2014 Challenge: "Pen and Paper Go Together"

I like pop-up notepads especially the bold and bright ones so when the Philippine Polymer Clay Guild announced  their Challenge for February 2014:  "Sweet Pairings," I got excited.  I made a pop-up notepad holder and also covered a pen with polymer clay using the wood grain technique.   I have seen this technique several times in books and as demonstrated by one of the Houston polymer clay guild members, Bob.  I tried to make 2 different kinds of woodgrain:  one using gold mica pc and the other was gold mixed with pearl and translucent.  The stitching around the box and the blue flowers completed the piece.
Polymer Clay Wood Grain
Pen and Pop-up Notepad Holder
I have seen this technique several times in books and as demonstrated by one of the Houston polymer clay guild members, Bob.  I tried to make 2 different kinds of woodgrain:  one using premo sculpey gold mica pc and the other was gold mixed with pearl and translucent.  The stitching around the box and the blue flowers completed the piece.

Head over to the Philippine Polymer Clay's Facebook to check out the other projects and LIKE us while you're there.  

Have a blessed day!
♥  michelle

Friday, January 17, 2014

[Food] Celebrating 5 at "Underbelly"

Today is our 5th Wedding Anniversary (cue in "Your Everything" by Keith Urban) and we are just grateful to God for giving us another year with each other.


Five years seemed to have gone so fast and now it's time for a C-E-L-E-B-R-A-T-I-O-N!  We went to "Underbelly Houston" to discover the "story of Houston Food."  The restaurant is owned by Executive Chef Chris Sheppard who is also Food and Wine's 2013 Best New Chef.  

We loved how they decorated the place because it was spacious and homey.  They added the a lot of wood panel that reminded me of our place in Manila.  Their wall features other local establishments such as Korean and Vietnamese restaurants to show how diverse Houston's restaurant world is.  The kitchen is open to guests so you can see the chefs prepare what they do best.  The shelves were full of jars of picked vegetables, sauces and stuff to fill your pantry.
with Exec. Chef Chris Sheppard of Underbelly Houston
And now, for the good stuff.  

We tried the Korean Braised Goat and dumplings which is one of their more popular appetizers.  It was delicious!  The meat was so tender with a hint of spice and the dumplings were soft with a bit of crunch.  The portion size was enough for both of us but if you're with a bigger group, you'd have to order more.  It's served family style so order several kinds to share with the group.

I got the Vietnamese Stew with Beef, Carrots and rice noodle.  The soup was thicker than the traditional pho and the beef was very tender.  Mr. C got the UB smoked burger which was really good.  The beef patty and thick slices of onions  topped with cheese was just yummy!

We didn't finish our main course because we had to leave space for dessert.  I got the Vinegar pie, salt brittle.  Be prepared to tickle your taste buds with this dessert that combines sweet, salty and sour in one bite (I know you are starting to drool right now).   

He got the Meyer pound cake, kissel, sezamki and butter ice cream.  The whaaaaat?  I've never heard of kissel only to find out it's an Eastern European dessert of crushed berries that have been thickened with starch.  Sezamki on the otherhand is a Polish candy dessert using sesame seeds and sugar.  It's similar to peanut brittle or "bandi" in the Philippines.  

Well, we were able to meet, chat and shake hands with Chef Chris who was very friendly and accommodating.  We had a good experience and would definitely return to try their dinner menu.  The price of their lunch menu ranged from $7 - $16 with desserts at $4 and $9.

Oh, the price of good food, great company and cherished memories. 

We definitely left with our bellies satisfied and our hearts filled with joy.  
Cheers!
♥  michelle  ♥